Vue3
官网
声明试渲染
当状态改变时,HTML 会自动更新
响应式:能在改变时触发更新的状态
组合式
1
2
3
4
5
6
7
8
9
10
11
| <script setup>
import { reactive, ref } from 'vue'
const counter = reactive({ count: 0 })
const message = ref('Hello World!')
</script>
<template>
<h1>{{ message }}</h1>
<p>Count is: {{ counter.count }}</p>
</template>
|
reactive和ref的比较:
reactive只能用于定义对象,ref可以定义任何类型
reactive是通过创建代理对象来实现响应式,给一个已经通过reactive创建的代理对象再套一层reactive返回的仍是原来的代理对象,代理对象里的属性也是被代理了;因此reactive对原始类型无效(number、string、boolean)
1
2
3
4
5
6
| const raw = {}
const proxy = reactive(raw)
console.log(proxy === raw) // false
console.log(reactive(raw) === proxy) // true
console.log(reactive(proxy) === proxy) // true
|
ref是将传入的值包装为一个带.value属性的对象。ref对象作为顶层元素在模板中使用时会自动解包,不需要.value;作为属性时需要.value
<script setup>中的setup表示里面定义的变量是响应式的
选项式
声明变量和对象
1
2
3
4
5
6
7
8
9
10
11
12
13
14
15
16
17
| <script>
export default {
data() {
return {
message: 'Hello World!',
counter: {
count: 0
}
}
}
}
</script>
<template>
<h1>{{ message }}</h1>
<p>Count is: {{ counter.count }}</p>
</template>
|
属性绑定v-bind :
v-bind:(缩写:)可以用于给标签的属性绑定
注意:
组合式
1
2
3
4
5
6
7
8
9
10
11
12
13
14
15
| <script setup>
import { ref } from 'vue'
const titleClass = ref('title')
</script>
<template>
<h1 :class="titleClass">Make me red</h1>
</template>
<style>
.title {
color: red;
}
</style>
|
响应式
1
2
3
4
5
6
7
8
9
10
11
12
13
14
15
16
17
18
19
| <script>
export default {
data() {
return {
titleClass: 'title'
}
}
}
</script>
<template>
<h1 :class='titleClass'>Make me red</h1> <!-- 此处添加一个动态 class 绑定 -->
</template>
<style>
.title {
color: red;
}
</style>
|
事件监听v-on @
通过v-on:或@来监听事件
注意:
- 可以直接写一些简单的表示式
- 直接绑定方法名,方法可以有一个原生 DOM 事件参数
event;绑定方法名(参数)可以传递参数, 但event没了;绑定方法名(参数, ..., $event)可以传入event
事件修饰符:
1
2
3
4
5
6
7
8
9
10
11
12
13
14
15
| <!-- 单击事件将停止传递 -->
<a @click.stop="doThis"></a>
<!-- 提交事件将不再重新加载页面 -->
<form @submit.prevent="onSubmit"></form>
<!-- 修饰语可以使用链式书写 -->
<a @click.stop.prevent="doThat"></a>
<!-- 也可以只有修饰符 -->
<form @submit.prevent></form>
<!-- 仅当 event.target 是元素本身时才会触发事件处理器 -->
<!-- 例如:事件处理器不来自子元素 -->
<div @click.self="doThat">...</div>
|
按键修饰符:
1
2
3
4
5
| <!-- 仅在 `key` 为 `Enter` 时调用 `submit` -->
<input @keyup.enter="submit" />
<!-- Alt + Enter -->
<input @keyup.alt.enter="clear" />
|
常用的按键的别名:
.enter.tab.delete (捕获“Delete”和“Backspace”两个按键).esc.space.up.down.left.right.ctrl.alt.shift.meta(win键).left(鼠标左键).right(鼠标右键).middle(鼠标中键)
组合式
1
2
3
4
5
6
7
8
9
10
11
12
13
| <script setup>
import { ref } from 'vue'
const count = ref(0)
function increment() {
count.value++
}
</script>
<template>
<!-- 使此按钮生效 -->
<button @click="increment">count is: {{ count }}</button>
</template>
|
选项式
1
2
3
4
5
6
7
8
9
10
11
12
13
14
15
16
17
18
19
| <script>
export default {
data() {
return {
count: 0
}
},
methods: {
increment() {
this.count++
}
}
}
</script>
<template>
<!-- 使此按钮生效 -->
<button @click="increment">count is: {{ count }}</button>
</template>
|
表单绑定v-model
1
2
3
4
5
6
7
8
9
10
11
12
13
14
15
16
17
18
19
| <script>
export default {
data() {
return {
text: ''
}
},
methods: {
onInput(e) {
this.text = e.target.value
}
}
}
</script>
<template>
<input :value="text" @input="onInput" placeholder="Type here">
<p>{{ text }}</p>
</template>
|
上面的写法需要通过v-bind和v-on来双向绑定
可以用语法糖<input v-model="text">,
<textarea>(多行文本)、<input type="checkbox">(选择框)、<select>(下拉框)、<input type="radio">(单选按钮)等也可以用v-model来简化绑定
修饰符
.lazy:v-model 会在每次 input 事件后更新数据v-model.lazy会在每次 change 事件后更新数据.number:用户输入自动转换为数字 .trim:自动去除用户输入内容中两端的空格
条件渲染v-if
通过v-if、v-else、v-else-if来选择渲染元素
v-show也可以,不同在于v-show是通过display来控制是否显示,v-if直接把元素删了
组合式
1
2
3
4
5
6
7
8
9
10
11
12
13
14
15
| <script setup>
import { ref } from 'vue'
const awesome = ref(true)
function toggle() {
awesome.value = !awesome.value
}
</script>
<template>
<button @click="toggle">toggle</button>
<h1 v-if="awesome">Vue is awesome!</h1>
<h1 v-else>Oh no </h1>
</template>
|
选项式
1
2
3
4
5
6
7
8
9
10
11
12
13
14
15
16
17
18
19
20
| <script>
export default {
data() {
return {
awesome: true
}
},
methods: {
toggle() {
this.awesome = !this.awesome
}
}
}
</script>
<template>
<button @click="toggle">toggle</button>
<h1 v-if="awesome">Vue is awesome!</h1>
<h1 v-else>Oh no</h1>
</template>
|
列表渲染v-for
通过v-for 变量 in 数组来遍历渲染一个数组
注意:
:key使得 Vue 能够精确的移动每个 <li>,以匹配对应的对象在数组中的位置。v-for也可以遍历对象的属性v-for="(value, key, index) in myObject"- 同一个标签里
v-if的优先级比v-for高
组合式
1
2
3
4
5
6
7
8
9
10
11
12
13
14
15
16
17
18
19
20
21
22
23
24
25
26
27
28
29
30
31
32
33
34
35
| <script setup>
import { ref } from 'vue'
// 给每个 todo 对象一个唯一的 id
let id = 0
const newTodo = ref('')
const todos = ref([
{ id: id++, text: 'Learn HTML' },
{ id: id++, text: 'Learn JavaScript' },
{ id: id++, text: 'Learn Vue' }
])
function addTodo() {
todos.value.push({ id: id++, text: newTodo.value })
newTodo.value = ''
}
function removeTodo(todo) {
todos.value = todos.value.filter((t) => t !== todo)
}
</script>
<template>
<form @submit.prevent="addTodo">
<input v-model="newTodo">
<button>Add Todo</button>
</form>
<ul>
<li v-for="todo in todos" :key="todo.id">
{{ todo.text }}
<button @click="removeTodo(todo)">X</button>
</li>
</ul>
</template>
|
选项式
1
2
3
4
5
6
7
8
9
10
11
12
13
14
15
16
17
18
19
20
21
22
23
24
25
26
27
28
29
30
31
32
33
34
35
36
37
38
39
| <script>
// 给每个 todo 对象一个唯一的 id
let id = 0
export default {
data() {
return {
newTodo: '',
todos: [
{ id: id++, text: 'Learn HTML' },
{ id: id++, text: 'Learn JavaScript' },
{ id: id++, text: 'Learn Vue' }
]
}
},
methods: {
addTodo() {
this.todos.push({ id: id++, text: this.newTodo })
this.newTodo = ''
},
removeTodo(todo) {
this.todos = this.todos.filter((t) => t !== todo)
}
}
}
</script>
<template>
<form @submit.prevent="addTodo">
<input v-model="newTodo">
<button>Add Todo</button>
</form>
<ul>
<li v-for="todo in todos" :key="todo.id">
{{ todo.text }}
<button @click="removeTodo(todo)">X</button>
</li>
</ul>
</template>
|
计算属性computed
注意:
- 计算属性应当只用来计算,不应该包含其他功能,减少复杂性
- 计算属性应该只读
组合式
1
2
3
4
5
6
7
8
9
10
11
12
13
14
15
16
17
18
19
20
21
22
23
24
| <script setup>
import { reactive, ref, computed } from 'vue'
const list = ref([1, 2, 3, 4, 5, 6, 7, 8])
const computedList = computed(() => {
return list.value.filter((val) => val > 2)
})
// 定时器,3秒后添加元素,计算属性也会重新计算
setTimeout(() => {
list.value.push(9, 10)
}, 3000)
</script>
<template>
<div>
原始数组:{{ list }}
</div>
<br/>
<div>
计算属性数组 {{ computedList }}
</div>
</template>
|
模板引用 ref
通过ref来获取指定的DOM元素
注意:
- DOM元素是在挂载后才有的
- 子组件可以通过
defineExpose({})来将属性值暴露给父组件
组合式
1
2
3
4
5
6
7
8
9
10
11
12
13
14
| <script setup>
import { ref, onMounted } from 'vue'
// 通过变量名来匹配DOM元素,此时还没挂载完,需要先设为null
const a = ref(null)
onMounted(() => {
a.value.textContent = 'mounted!'
})
</script>
<template>
<p ref="a">hello</p>
</template>
|
选项式
1
2
3
4
5
6
7
8
9
10
11
| <script>
export default {
mounted() {
this.$refs.a.textContent = 'world'
}
}
</script>
<template>
<p ref="a">hello</p>
</template>
|
生命周期
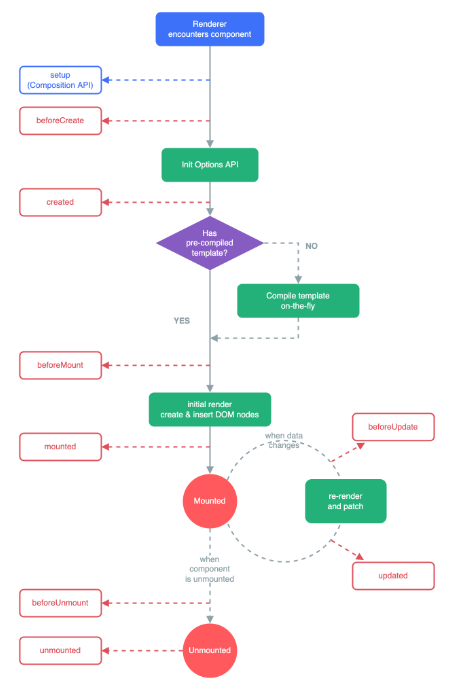
组合式
和选项式的区别在于生命周期的名字前加上了on,除了Created换成了setup
如果定义了多个相同的生命周期函数,则会依次调用
1
2
3
4
5
6
7
| <script setup>
import { onMounted } from 'vue'
onMounted(() => {
console.log('asdasd')
})
</script>
|
监听器watch
当data发生改变时触发
注意
监听器只有在发生改变时触发,如果要创建时就触发需要实现handle方法和设置immediate=true
1
2
3
4
5
6
7
8
9
| watch: {
a: {
handler(newA) {
newA = 'b'
this.a = newA
},
immediate: true
}
}
|
如果要监听对象里属性的变化,需要设置deep:true,这里监听属性是通过遍历实现的,效率很低
1
2
3
4
5
6
7
8
9
10
11
12
13
14
15
16
17
18
19
20
21
22
| export default {
data() {
return {
a: {
b: 'b'
}
}
},
methods: {
},
watch: {
a: {
b: {
handler(newB) {
this.b = newB
},
deep: true
}
}
}
}
|
监听器是在属性改变前触发,要改变后触发,需要设置flush: 'post'
通过this.$watch方法创建监听器,好处是可以通过调用返回的方法来停止监听器
1
2
3
4
5
6
7
8
| export default {
created() {
const w = this.$watch('question', (newQuestion) => {
// ...
})
w()
}
}
|
组合式
组合式要开启深度侦听、立即回调等功能是在watch第三个参数里传一个对象
如果要精确监听对象的某个值,则第一个参数改为回调函数,返回要监听的那个值
1
2
3
4
5
6
7
8
9
10
11
12
13
14
15
16
17
18
19
20
21
22
23
24
25
26
27
| <script setup>
import { ref, watch } from 'vue'
const todoId = ref(1)
const todoData = ref(null)
async function fetchData() {
todoData.value = null
const res = await fetch(
`https://jsonplaceholder.typicode.com/todos/${todoId.value}`
)
todoData.value = await res.json()
}
fetchData()
watch(todoId, (newTodoId) => {
fetchData()
})
</script>
<template>
<p>Todo id: {{ todoId }}</p>
<button @click="todoId++">Fetch next todo</button>
<p v-if="!todoData">Loading...</p>
<pre v-else>{{ todoData }}</pre>
</template>
|
选项式
1
2
3
4
5
6
7
8
9
10
11
12
13
14
15
16
17
18
19
20
21
22
23
24
25
26
27
28
29
30
31
32
33
34
| <script>
export default {
data() {
return {
todoId: 1,
todoData: null
}
},
methods: {
async fetchData() {
this.todoData = null
const res = await fetch(
`https://jsonplaceholder.typicode.com/todos/${this.todoId}`
)
this.todoData = await res.json()
}
},
mounted() {
this.fetchData()
},
watch: {
todoId(newId) {
this.fetchData()
}
}
}
</script>
<template>
<p>Todo id: {{ todoId }}</p>
<button @click="todoId++">Fetch next todo</button>
<p v-if="!todoData">Loading...</p>
<pre v-else>{{ todoData }}</pre>
</template>
|
组件 import
组合式
1
2
3
4
5
6
7
| <script setup>
import ChildComp from './ChildComp.vue'
</script>
<template>
<ChildComp />
</template>
|
选项式
1
2
3
4
5
6
7
8
9
10
11
12
13
14
| <script>
import ChildComp from './ChildComp.vue'
export default {
// register child component
components: {
ChildComp
}
}
</script>
<template>
<!-- render child component -->
<ChildComp />
</template>
|
父组件向子组件传值props
子组件定义prop,父组件通过属性绑定传值
组合式
1
2
3
4
5
6
7
8
9
10
| <script setup>
import { ref } from 'vue'
import ChildComp from './ChildComp.vue'
const greeting = ref('Hello from parent')
</script>
<template>
<ChildComp :msg='greeting'/>
</template>
|
子组件
1
2
3
4
5
6
7
8
9
10
| <script setup>
const props = defineProps({
msg: String
})
console.log(props)
</script>
<template>
<h2>{{ msg || 'No props passed yet' }}</h2>
</template>
|
选项式
1
2
3
4
5
6
7
8
9
10
11
12
13
14
15
16
17
18
| <script>
import ChildComp from './ChildComp.vue'
export default {
components: {
ChildComp
},
data() {
return {
greeting: 'Hello from parent'
}
}
}
</script>
<template>
<ChildComp :msg="greeting"/>
</template>
|
子组件
1
2
3
4
5
6
7
8
9
10
11
| <script>
export default {
props: {
msg: String
}
}
</script>
<template>
<h2>{{ msg || 'No props passed yet' }}</h2>
</template>
|
子组件向父组件传值emits
子组件定义触发器emit,父组件通过事件监听获取子组件的值
组合式
1
2
3
4
5
6
7
8
9
10
11
| <script setup>
import { ref } from 'vue'
import ChildComp from './ChildComp.vue'
const childMsg = ref('No child msg yet')
</script>
<template>
<ChildComp @response='(msg) => childMsg = msg'/>
<p>{{ childMsg }}</p>
</template>
|
子组件
1
2
3
4
5
6
7
8
9
| <script setup>
const emit = defineEmits(['response'])
emit('response', 'hello from child')
</script>
<template>
<h2>Child component</h2>
</template>
|
选项式
1
2
3
4
5
6
7
8
9
10
11
12
13
14
15
16
17
18
19
| <script>
import ChildComp from './ChildComp.vue'
export default {
components: {
ChildComp
},
data() {
return {
childMsg: 'No child msg yet'
}
}
}
</script>
<template>
<ChildComp @response='(msg) => childMsg = msg'/>
<p>{{ childMsg }}</p>
</template>
|
子组件
1
2
3
4
5
6
7
8
9
10
11
12
| <script>
export default {
emits: ['response'],
created() {
this.$emit('response', 'hello from child')
}
}
</script>
<template>
<h2>Child component</h2>
</template>
|
父组件向子组件传模板slot
子组件使用插槽<slot>作为占位符,父组件传来的模板会放到这个位置
组合式
1
2
3
4
5
6
7
8
9
10
| <script setup>
import { ref } from 'vue'
import ChildComp from './ChildComp.vue'
const msg = ref('from parent')
</script>
<template>
<ChildComp>asd</ChildComp>
</template>
|
子组件
1
2
3
| <template>
<slot>Fallback content</slot>
</template>
|
选项式
1
2
3
4
5
6
7
8
9
10
11
12
13
14
15
16
17
18
| <script>
import ChildComp from './ChildComp.vue'
export default {
components: {
ChildComp
},
data() {
return {
msg: 'from parent'
}
}
}
</script>
<template>
<ChildComp>asd</ChildComp>
</template>
|
1
2
3
| <template>
<slot>Fallback content</slot>
</template>
|
跨层传递数据provide inject
上层组件通过provide定义数据/方法,下层通过inject获取数据/方法
组合式
第一层
1
2
3
4
5
6
7
8
9
10
11
12
13
14
15
16
17
18
19
20
21
22
23
24
| <script setup>
import { provide, ref } from 'vue';
import RoomMsgItem from './room-msg-item.vue'
// 传递普通数据
provide('data-key', 'this is room data')
// 传递响应式数据
const count = ref(0)
provide('count-key', count)
</script>
<template>
<div>
顶层组件
<br/> ============ <br/>
<input type="button" @click="() => count++" :value="count"/>
<div>
<RoomMsgItem/>
</div>
============
</div>
</template>
|
第二层
1
2
3
4
5
6
7
8
9
10
11
12
13
14
15
16
| <script setup>
import roomMsgComment from './room-msg-comment.vue';
</script>
<template>
<div>
中间层组件
<br/> -------
<div>
<roomMsgComment/>
</div>
-------
</div>
</template>
|
第三层
1
2
3
4
5
6
7
8
9
10
11
12
13
14
15
16
17
18
| <script setup>
import { inject } from 'vue';
const roomData = inject('data-key')
const countData = inject('count-key')
</script>
<template>
<div>
底层组件
</div>
<div>
来自顶层组件中的数据为: {{ roomData }}
</div>
<div>
来自顶层组件的响应式数据为: {{ countData }}
</div>
</template>
|
注册全局指令
标签里使用时v-自定义指令名=''
1
2
3
4
5
6
7
8
9
10
11
12
13
14
15
16
17
18
19
20
21
22
23
24
25
26
27
|
import { useIntersectionObserver } from '@vueuse/core'
export const layzPlugin = {
install(app) {
app.directive('img-lazy', {
mounted(el, binding) {
const {stop} = useIntersectionObserver(
el,
([{ isIntersecting }]) => {
if (isIntersecting) {
el.src = binding.value
stop()
}
},
)
}
})
}
}
|
导入自定义指令
1
2
3
4
5
6
7
8
9
10
11
12
13
14
15
16
|
import { createApp } from 'vue'
import { createPinia } from 'pinia'
import App from './App.vue'
import router from './router'
import './styles/common.scss'
import { layzPlugin } from './directives'
createApp(App)
.use(createPinia())
.use(router)
.use(layzPlugin)
.mount('#app')
|
注册全局组件
和注册全局指令类似,先创建插件,再把插件注册到app中
1
2
3
4
5
6
7
8
9
10
11
12
|
import ImageView from '@/components/ImageView/index.vue'
import Sku from '@/components/XtxSku/index.vue'
export const componentPlugin ={
install(app) {
app.component('XtxImageView', ImageView)
app.component('XtxSku', Sku)
}
}
|
1
2
3
4
5
6
7
8
9
10
11
12
13
14
15
16
17
18
|
import { createApp } from 'vue'
import { createPinia } from 'pinia'
import App from './App.vue'
import router from './router'
import './styles/common.scss'
import { layzPlugin } from './directives'
import { componentPlugin } from './components/index'
createApp(App)
.use(createPinia())
.use(router)
.use(layzPlugin)
.use(componentPlugin)
.mount('#app')
|
项目搭建
create-vue是Vue官方新的脚手架工具,底层使用vite
Vite文档
环境要求:Node.js版本16.0及以上
创建Vue应用
1
2
3
| npm init vue@latest
// 会安装并执行create-vue
// 之后选择需要的依赖来初始化项目
|
主要文件/文件夹
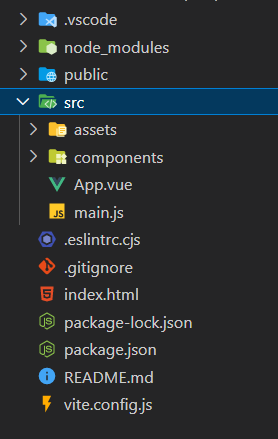
- package.json:用于描述项目所需依赖包、项目的信息、脚本命令等的元数据文件
- vite.config.js:项目的配置文件,基于Vite的配置
- main.js:项目入口文件
- App.vue:根组件
常见的自己创建的文件夹
- apis:API接口文件夹
- composables:组合函数文件夹,放一些从组件中封装出来的函数
- directives:全局指令文件夹
- styles:全局样式文件夹
- utils:工具函数文件夹
Element Plus
基于 Vue 3的Element UI
Element Plue中文文档
安装
安装依赖
1
| npm install element-plus --save
|
按需导入(只加载使用到的组件)需要额外安装插件
1
| npm install -D unplugin-vue-components unplugin-auto-import
|
vite.config.js配置导入插件
1
2
3
4
5
6
7
8
9
10
11
12
13
14
15
16
17
18
|
import { defineConfig } from 'vite'
import AutoImport from 'unplugin-auto-import/vite'
import Components from 'unplugin-vue-components/vite'
import { ElementPlusResolver } from 'unplugin-vue-components/resolvers'
export default defineConfig({
plugins: [
AutoImport({
resolvers: [ElementPlusResolver()],
}),
Components({
resolvers: [ElementPlusResolver()],
}),
],
})
|
测试组件是否能用
定制ElementPlus主题样式
组件库里的样式没有合适的,需要自己定制
基于sass定制样式
安装sass(css扩展语言)
在src/styles/element/index.scss里添加准备好的定制化样式文件
1
2
3
4
5
6
7
8
9
10
11
12
13
14
15
16
17
18
19
20
21
22
23
24
25
|
@forward 'element-plus/theme-chalk/src/common/var.scss' with (
$colors: (
'primary': (
// 主色
'base': #27ba9b,
),
'success': (
// 成功色
'base': #1dc779,
),
'warning': (
// 警告色
'base': #ffb302,
),
'danger': (
// 危险色
'base': #e26237,
),
'error': (
// 错误色
'base': #cf4444,
),
)
)
|
修改vite.config.js配置文件
1
2
3
4
5
6
7
8
9
10
11
12
13
14
15
16
|
Components({
resolvers: [ElementPlusResolver({ importStyle: 'sass' })],
}),
css: {
preprocessorOptions: {
scss: {
additionalData: `
@use "@/styles/element/index.scss" as *;
`,
}
}
}
|
axios
安装&基础配置
安装依赖
基础配置
1
2
3
4
5
6
7
8
9
10
11
12
13
14
15
16
17
18
19
20
21
22
23
24
|
import axios from "axios"
const httpInstance = axios.create({
baseURL: 'http://pcapi-xiaotuxian-front-devtest.itheima.net',
timeout: 5000
})
httpInstance.interceptors.request.use(config => {
return config
}, e => Promise.reject(e))
httpInstance.interceptors.response.use(res => res.data, e => {
return Promise.reject(e)
})
export default httpInstance
|
创建api请求
1
2
3
4
5
6
7
8
9
|
import httpInstance from "@/utils/http"
export function getCategory() {
return httpInstance({
url: 'home/category/head'
})
}
|
测试
1
2
3
4
| import { getCategory } from '@/apis/testAPI'
getCategory().then(res => {
console.log(res)
})
|
Router
一级路由
在src/router/index.js文件里添加修改路由信息
1
2
3
4
5
6
7
8
9
10
11
12
13
14
15
16
17
18
19
20
21
22
23
| import { createRouter, createWebHistory } from 'vue-router'
import Login from '@/views/Login/index.vue'
import Layout from '@/views/Layout/index.vue'
const router = createRouter({
history: createWebHistory(import.meta.env.BASE_URL),
routes: [
{
path: '/',
component: Layout
},
{
path: '/login',
component: Login
}
]
})
export default router
|
根组件App.vue里记得添加一级路由出口(一级路由的组件会被渲染到这个位置)
1
2
3
4
| <template>
<!-- 一级路由出口组件 -->
<RouterView />
</template>
|
二级路由
通过children来配置子路由
1
2
3
4
5
6
7
8
9
10
11
12
13
14
15
16
17
18
19
20
21
22
23
24
25
26
27
28
29
30
31
32
33
34
35
| import { createRouter, createWebHistory } from 'vue-router'
import Login from '@/views/Login/index.vue'
import Layout from '@/views/Layout/index.vue'
import Home from '@/views/Home/index.vue'
import Category from '@/views/Category/index.vue'
const router = createRouter({
history: createWebHistory(import.meta.env.BASE_URL),
routes: [
{
path: '/',
component: Layout,
children: [
{
path: '',
component: Home
},
{
path: 'category',
component: Category
},
]
},
{
path: '/login',
component: Login
}
]
})
export default router
|
在父组件里添加路由出口
1
2
3
4
5
6
| <template>
<div>
首页
<RouterView/>
</div>
</template>
|
路由缓存问题
例如路由为/users/a导航到/users/b时,组件将被重复使用。两个路由中相同的组件会被复用,更加高效。
但是复用的组件的生命周期钩子函数不会再被调用,导致数据无法更新
解决方式:
不让组件复用
1
2
| <!-- 给RouterView添加:key来避免复用 -->
<RouterView :key="$route.fullPath"/>
|
监听路由变化,变化后更新数据
在组件里使用router的onBeforeRouteUpdate()函数来监听路由变化
1
2
3
4
5
6
7
8
9
10
11
12
13
14
15
16
17
18
19
20
21
22
23
24
25
26
27
28
29
30
31
32
| <script setup>
import { getCategoryAPI } from '@/apis/category';
import { ref, onMounted } from 'vue';
import { onBeforeRouteUpdate, useRoute } from 'vue-router';
import { getBannerAPI } from '@/apis/home';
import GoodsItem from '../Home/components/GoodsItem.vue';
// 获取商品分类数据
const router = useRoute()
const categoryData = ref({})
async function getCategory(id = router.params.id) {
const res = await getCategoryAPI(id)
categoryData.value = res.result
}
// 获取轮播图数据
const bannerList = ref([])
async function getBanner() {
const res = await getBannerAPI({distributionSite: '2'})
bannerList.value = res.result
}
onMounted(() => {
getCategory()
getBanner()
})
// 监听路由变化来更新数据
onBeforeRouteUpdate((to) => {
getCategory(to.params.id)
})
</script>
|
VueUse
基于组合式API的工具集,可以用于如跟踪ref更改,检测元素可见性,简化常见 Vue 模式,键盘/鼠标输入等
中文文档
英文文档
Swiper
Swiper是纯javascript打造的滑动特效插件,面向手机、平板电脑等移动终端;Swiper能实现触屏焦点图、触屏Tab切换、触屏轮播图切换等常用效果。
官网
安装
安装依赖(以10.1.0为例)
1
| npm install swiper@10.1.0
|
测试
1
2
3
4
5
6
7
8
9
10
11
12
13
14
15
16
17
18
19
20
21
22
23
24
25
26
27
28
| <script setup>
import { Swiper, SwiperSlide } from 'swiper/vue';
// 仅包含核心样式
import 'swiper/css';
// 所有样式
// import 'swiper/css/bundle'
const onSwiper = (swiper) => {
console.log(swiper);
};
const onSlideChange = () => {
console.log('slide change');
};
</script>
<template>
<swiper
:slides-per-view="2"
:space-between="50"
@swiper="onSwiper"
@slideChange="onSlideChange"
>
<swiper-slide>Slide 1</swiper-slide>
<swiper-slide>Slide 2</swiper-slide>
<swiper-slide>Slide 3</swiper-slide>
</swiper>
</template>
|
使用
官网找demo, 然后看API里的属性来设置
1
2
3
4
5
6
7
8
9
10
11
12
13
14
15
16
17
18
19
20
21
22
23
24
25
26
27
28
29
30
31
32
33
34
35
36
37
38
39
40
41
42
43
44
45
46
47
48
49
50
51
52
53
| <script setup>
// 图片切换淡入淡出效果
import { Swiper, SwiperSlide } from 'swiper/vue';
import { EffectFade, Autoplay } from 'swiper/modules';
import 'swiper/css';
import 'swiper/css/effect-fade';
import 'swiper/css/autoplay';
// 淡入淡出, 自动播放
const modules = [EffectFade, Autoplay]
const sectionOneData = {
swipeItems: [
'https://ts1.cn.mm.bing.net/th/id/R-C.3428ce0dc9ffcb71b43de5e4de53c3be?rik=oWeInFhSbuc8ew&riu=http%3a%2f%2fwww.nitutu.com%2fuploads%2fallimg%2f170808%2f2039463303-20.jpg&ehk=lpq14%2bXdQdGE9HANkVnv4hVNUxLwGvK%2bev1nGJ%2fuGAY%3d&risl=&pid=ImgRaw&r=0',
'https://ts1.cn.mm.bing.net/th/id/R-C.e76fb1e2661ae7a2f33ce54a3b192d6a?rik=DzfFM6%2fW%2bBpHGQ&riu=http%3a%2f%2fpic.newface.cn%2farticle%2f2016%2f01%2f20160130095735_9675.jpg&ehk=c00UX3veD414tlKaUbYIW8QsXgKzwfTUATYAU30SQqY%3d&risl=&pid=ImgRaw&r=0',
'https://ts1.cn.mm.bing.net/th/id/R-C.a139d5e3ce46969368baaf05ba1c70e7?rik=83nAr%2bmixceprg&riu=http%3a%2f%2fimgboys1.yohobuy.com%2fcontentimg%2f2019%2f10%2f10%2f22%2f0185fd68a7d869c5e79dfec8609a8e8593.jpg&ehk=TGV5OB8lBfPprp0KFFdZdaIgh%2bJmcGB93KQHZHWVMwk%3d&risl=&pid=ImgRaw&r=0',
'https://ts1.cn.mm.bing.net/th/id/R-C.c86ee2951bf2f3c55e8f13fdc152d561?rik=Biz9aDUCRPU4tA&riu=http%3a%2f%2fimgboys2.yohobuy.com%2fcontentimg%2f2019%2f10%2f10%2f22%2f021bd574784425d516b08715b49d40eb26.jpg&ehk=QRmm0m1XUPBIQXJD%2f9Q4KeKv6d4n4%2fRuFMLc%2fl3B%2fUg%3d&risl=&pid=ImgRaw&r=0'
]
}
</script>
<template>
<div class="swipe-warp">
<!-- 淡入淡出, 循环播放, 播放间隔3s, 用户拖动图片后不禁用自动播放 -->
<swiper class="swipe"
:modules="modules"
:effect="'fade'"
:loop="true"
:autoplay="{ delay: 3000, disableOnInteraction: false }">
<swiper-slide v-for="item in sectionOneData.swipeItems" :key="item">
<img :src="item"/>
</swiper-slide>
</swiper>
</div>
</template>
<style>
.swipe-warp {
.swipe {
color: #fff;
width: 375px;
height: 375px;
overflow: hidden; /* 溢出内容隐藏 */
background-color: #39a9ed;
.swiper-slide > img {
width: 100%;
object-fit: cover; /* 等比例缩放,以填充容器,并保持其宽高比 */
}
}
}
</style>
|
GSAP
GreenSock Animation Platform,可以对JavaScript可以操作的所有内容进行动画处理(CSS属性,SVG,React,画布,通用对象等),同时解决了不同浏览器上存在的兼容性问题,而且速度极快
官网
安装
Bootstrap
Bootstrap是一个功能强大、功能丰富的前端工具包。在几分钟内即可构建从原型到生产的任何内容。
文档
安装
1
2
3
4
5
| npm i --save bootstrap @popperjs/core
# 安装额外的依赖Sass来正确导入和捆绑 Bootstrap 的 CSS
npm i --save-dev sass
# 安装图标库
npm i bootstrap-icons
|
创建文件assets/styles.scss
1
2
3
4
|
@import "bootstrap/scss/bootstrap";
@import 'bootstrap-icons/font/bootstrap-icons.css';
|
main.js导入
1
2
3
| import './assets/styles.scss'
import "@popperjs/core";
import "bootstrap";
|