Java并发编程 基础 1.进程和线程 进程 可以视为程序的一个实例,程序可以启动一个或多个实例进程,进程就是用来加载指令、管理内存、管理 IO 的。
线程 是属于进程的,一个线程就是一个指令流,将指令流中的一条条指令以一定的顺序交给 CPU 执行
比较
进程:资源分配的最小单位,线程:调度的最小单位
进程基本相互独立,线程存在于进程内,是进程的一个子集
进程间通信较为复杂(统一计算机间、不同计算机间),线程通信相对简单
线程上下文切换成本比进程低
2.并发和并行 举例
并发:单个CPU同一时间执行多条指令(交替)
并行:多个CPU同一时间同时执行指令
并行和并发是同时存在的
3.同步和异步 同步:等待运行完返回结果才继续执行之后的代码
异步:不等,继续执行之后的代码
4.Java线程基础 创建线程方式 (1) 直接new Thread()
1
2
3
4
5
6
7
8
9
10
11
12
13
14
15
16
17
18
19
20
public static void main (String[] args) {Thread t = new Thread () {@Override public void run () {"running" );"t1" );"running" );
**(2)**Runnable 配合Thread
1
2
3
4
5
6
7
8
9
10
11
12
13
14
15
16
public void test2 () {Runnable r = new Runnable (){@Override public void run () {"running" );Thread t = new Thread (r, "t2" );"running" );
用 Runnable 更容易与线程池等高级 API 配合
用 Runnable 让任务类脱离了 Thread 继承体系,更灵活
**(3)**FutureTask配合Thread
1
2
3
4
5
6
7
8
9
10
11
12
13
14
15
16
17
18
19
20
21
22
@SneakyThrows @Test public void test3 () {new FutureTask <Integer>(new Callable <Integer>() {@Override public Integer call () throws Exception {"running" );1000 );return 100 ;Thread t3 = new Thread (task, "t3" );"{}" , task.get());
FutureTask 能够接收 Callable 类型的参数,用来处理有返回结果 的情况
5.ThraedLocal 线程本地变量。如果你创建了一个ThreadLocal变量,那么访问 这个变量的每个线程都会有这个变量的一个本地拷贝 ,多个线程操作这个变量的时 候,实际是操作自己本地内存里面的变量,从而起到线程隔离 的作用,避免了线程安全问题
使用
创建:new
存储:set
获取:get
使用场景
存储用户token、数据库连接池存储Connection(保证当前线程用的是同一个连接对象)
原理
每个线程都有个ThreadLocalMap来存储ThreadLocal(的弱引用)和value之间的映射关系
ThreadLocal本身不存值,只是作为key来往map中存值
哈希冲突时用开放定址法来解决哈希冲突
当清理完过期的Entry后元素数量超过75%会进行扩容
弱引用:只有弱引用的对象被垃圾回收器扫到后会被回收
这里只会回收ThreadLocal,而value回收不到,有内存泄漏的风险
解决方式:不用了remove()掉
进程 5.查看进程方式 windows
任务管理器
tasklist 查看所有进程, 可以tasklist | findstr <关键字>来筛选进程taskkill杀死进程, 参数:/F /PID <pid> 强制杀死指定pid的进程
linux
ps -ef 查看所有进程ps -fT -p <PID>查看进程号为PID的所有线程kill杀死进程top 动态显示进程,按H切换是否显示进程top -H -p <PID> 查看进程号为PID的所有线程
java(jdk自带的)
jps(java process status) 查看所有java进程
jstack <PID> 查看某一时刻该进程的所有线程状态
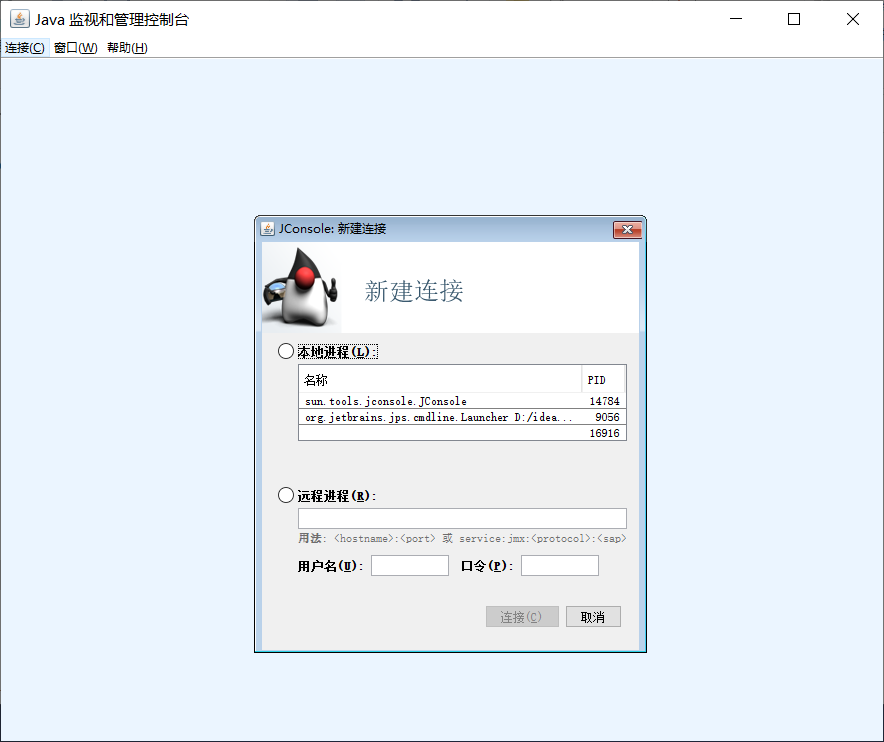
jconsole 来查看某个 Java 进程中线程的运行情况(图形界面)
6.线程运行 栈和栈帧
JVM中由堆、栈 和方法区组成。每个线程启动后,虚拟机就会为其分配一块栈内存
线程栈是相互独立的,每个线程栈由多个栈帧 (Frame)组成,对应每次方法调用时占用的内存(局部变量表、返回地址等)
每个线程只能有一个活动栈帧 ,对应当前正在执行的那个方法
上下文切换 导致CPU切换线程的原因
线程的cpu时间片用完
垃圾回收时会停止所有线程,转而运行垃圾回收的线程
来了优先级更高的线程
当前线程自己休眠了等
切换时需要保存当前线程的状态(局部变量、操作数栈、返回地址等)
频繁切换会影响性能
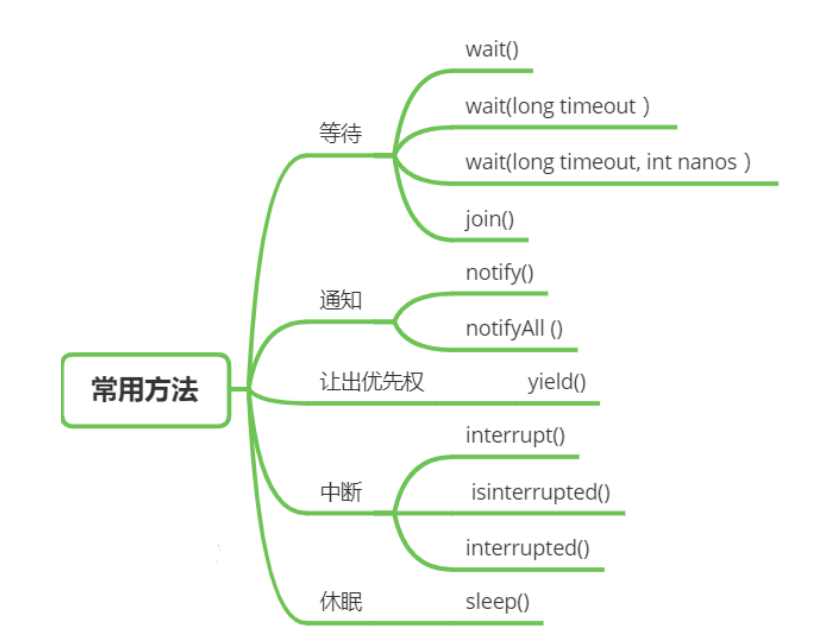
线程常见方法
方法
说明
public void start()
启动一个新线程,Java虚拟机调用此线程的 run 方法
public void run()
线程启动后调用该方法
public void setName(String name)
给当前线程取名字
public void getName()
获取当前线程的名字 线程存在默认名称:子线程是 Thread-索引,主线程是 main
public static Thread currentThread()
获取当前线程对象,代码在哪个线程中执行
public static void sleep(long time)
让当前线程休眠多少毫秒再继续执行 Thread.sleep(0) : 让操作系统立刻重新进行一次 CPU 竞争
public static native void yield()
提示线程调度器让出当前线程对 CPU 的使用
public final int getPriority()
返回此线程的优先级
public final void setPriority(int priority)
更改此线程的优先级,常用 1 5 10
public void interrupt()
中断这个线程,异常处理机制
public static boolean interrupted()
判断当前线程是否被打断,清除打断标记
public boolean isInterrupted()
判断当前线程是否被打断,不清除打断标记
public final void join()
等待这个线程结束
public final void join(long millis)
等待这个线程死亡 millis 毫秒,0 意味着永远等待
public final native boolean isAlive()
线程是否存活(还没有运行完毕)
public final void setDaemon(boolean on)
将此线程标记为守护线程或用户线程
run start
直接调用run方法相当于在当前线程中进行了普通的方法调用,
使用start方法则为启动新的线程,通过新的线程执行run中的代码
sleep yield sleep
调用 sleep 会让当前线程从 Running 进入 Timed Waiting 状态 (阻塞)
当睡眠时间结束后状态为Runnable
可以使用TimeUnit的sleep来使线程睡眠(可以更好的看出时间单位)
1
2
3
4
5
6
7
8
9
10
11
12
13
14
15
16
17
18
19
20
21
22
23
public static void main (String[] args) {Thread t1 = new Thread ("t1" ) {@Override public void run () {try {2000 );catch (InterruptedException e) {"t1 state: {}" , t1.getState());try {1000 );catch (InterruptedException e) {"t1 state: {}" , t1.getState());
yields
会让当前线程从 Running 进入 Runnable 就绪状态
线程优先级
通过setPriority 设置线程优先级,但只是给调度器的参考
最终如何分配时间片还是由调度器决定
1
2
3
4
5
6
7
8
9
10
11
12
13
14
15
16
17
18
19
20
21
22
public static void main (String[] args) {Runnable task1 = () -> {int count = 0 ;for (;;) {"---->1 " + count++);Runnable task2 = () -> {int count = 0 ;for (;;) {" ---->2 " + count++);Thread t1 = new Thread (task1, "t1" );Thread t2 = new Thread (task2, "t2" );
join
join()等待这个线程结束
join(long n) 最多等待n秒
1
2
3
4
5
6
7
8
9
10
11
12
13
14
15
16
17
18
19
20
static int r = 0 ;public static void main (String[] args) throws InterruptedException {"开始" );Thread t1 = new Thread (() -> {"开始" );try {3000 );catch (InterruptedException e) {10 ;"结束" );"t1" );"r: {}" , r); "结束" );
interrupt
打断正在运行的线程
1 2 3 4 5 6 7 8 9 10 11 12 13 14 15 16 17 18 19 20 public static void main (String[] args) throws InterruptedException {Thread t1 = new Thread (() -> {"sleep.." );try {50000 );catch (InterruptedException e) {"被打断" );"t1" );1000 );"interrupt" );"打断标记:{}" , t1.isInterrupted());
1 2 3 4 5 6 7 8 9 10 11 12 13 14 15 public static void main (String[] args) throws InterruptedException {Thread t1 = new Thread (() -> {while (true ) {if (Thread.currentThread().isInterrupted()) {break ;"t1" );1000 );"interrupt" );
wait notify
wait 让当前线程进入WaitSet ,变为WAITING 状态
当Owner线程调用notify 时会唤醒wait的线程中的一个,并让其进入阻塞队列来竞争锁
notifyAll 会唤醒wait的所有线程
1
2
3
4
5
6
7
8
9
10
11
12
13
14
15
16
17
18
19
20
21
22
23
24
25
26
27
28
29
30
31
32
33
34
35
public static Object lock = new Object ();@SneakyThrows public static void main (String[] args) throws InterruptedException {Thread t1 = new Thread (() -> {synchronized (lock) {try {catch (InterruptedException e) {"t1被唤醒" );"t1" );Thread t2 = new Thread (() -> {synchronized (lock) {try {catch (InterruptedException e) {"t2被唤醒" );"t2" );2000 );synchronized (lock) {
sleep和wait区别:wait会让出锁,sleep是抱着锁睡觉
如果有多个wait的线程,可能唤醒的不是想要唤醒的线程(虚假唤醒)
park unpark
LockSupport.park() 暂停当前线程
LockSupport.unpark(线程对象) 恢复当前线程
和wait notify区别:
wait notify需要获得锁对象,park unpark 不需要
park unpark是以线程为单位来阻塞和唤醒线程,比wait notify精确
park unpark 可以先 unpark,而 wait & notify 不能先 notify
park unpark 原理:
每个线程都有自己的一个 Parker 对象,由三部分组成 _counter , _cond 和 _mutex
调用park() 就是检查_counter是否为0,为0则进入wait状态;为1则置为0,下次再park时则进入wait状态
调用park()就是置_counter为1
1
2
3
4
5
6
7
8
9
10
11
12
13
14
15
16
17
18
19
20
21
public class Test6 {public static void main (String[] args) throws InterruptedException {Thread t1 = new Thread (() -> {"start..." );try {1000 );catch (InterruptedException e) {"park" );"resume..." );"t1" );2000 );"unpark..." );
主线程和守护线程
默认情况Java进程需要等所有线程都运行结束,进程才会结束
而不需要等待守护线程,技术守护线程没有执行完,也会强制结束
1
2
3
4
5
6
7
8
9
10
11
12
13
14
15
public static void main (String[] args) throws InterruptedException {Thread t1 = new Thread (() -> {while (true ) {if (Thread.currentThread().isInterrupted())break ;"t1结束" );"t1" );true ); 1000 );"main结束" );
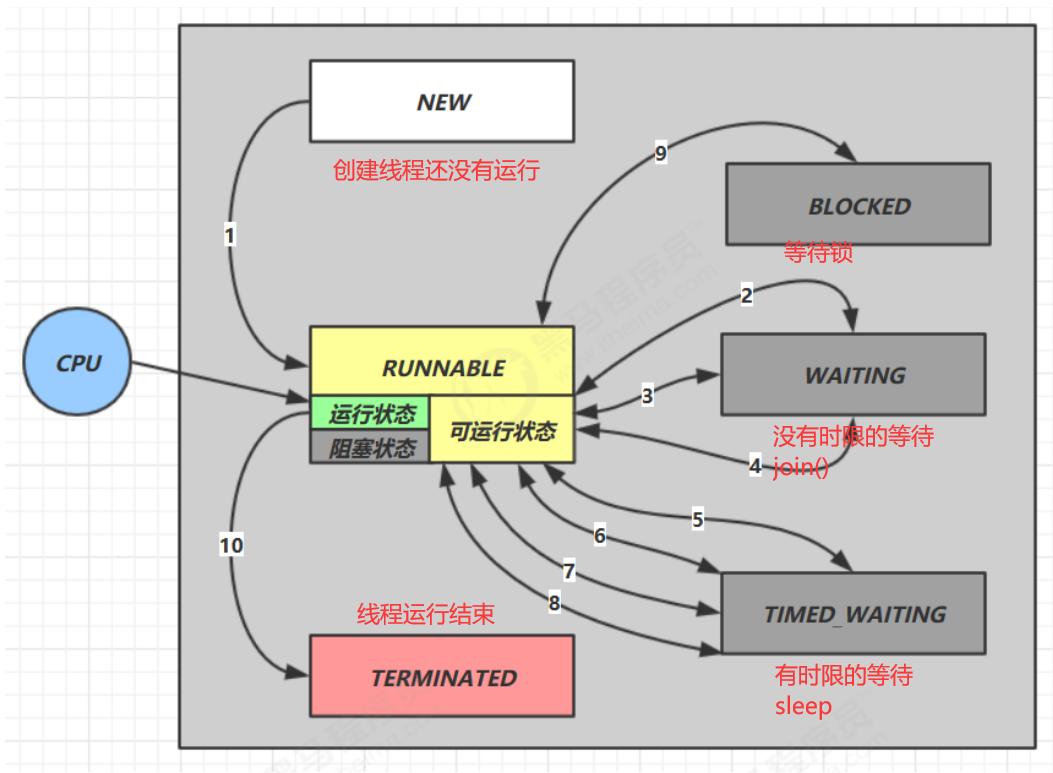
线程状态
调用**start()**,NEW –> RUNNABLE
获取到对象锁obj后
调用**obj.wait()**,RUNNABLE –> WAITING
其他线程调用**obj.notify()/notifyAll()/interrupt()**,线程从WAITTING中被唤醒到BLOCKED
竞争锁成功,WATTING –> RUNNABLE
竞争锁失败,WAITTING –> BLOCKED
当前线程调用**t.join()**(当前线程在t线程的管程上等待),从RUNNABLE –> WAITTING
t线程运行结束或调用当前线程的interrupt(),当前线程从WAITTING –> RUNNABLE
调用LockSupport.park() ,RUNNABLE –> WAITTING
调用**LockSupport.unpark(目标线程)**,目标线程WAITTING –> RUNNABLE
获取到对象锁obj后
调用**obj.wait(long n)**,RUNNABLE –> TIME_WAITING
等待时间超过n毫秒,或其他线程调用obj.notify()/notifyAll()/interrupt()
竞争锁成功,TIME_WAITING–> RUNNABLE
竞争锁失败,TIME_WAITING–> BLOCKED
当前线程调用**t.join(long n)**(当前线程在t线程的管程上等待),从RUNNABLE –> TIME_WAITING
等待时间超过n毫秒,或t线程运行结束或调用当前线程的interrupt(),当前线程从TIME_WAITING–> RUNNABLE
当前线程调用 Thread.sleep(long n) ,当前线程从 RUNNABLE –> TIMED_WAITING
等待时间超过n毫秒,当前线程从TIME_WAITING–> RUNNABLE
调用LockSupport.parkNanos(long nanos) ,RUNNABLE –> TIME_WAITING
等待时间超过nanos纳秒,或调用**LockSupport.unpark(目标线程)**,目标线程TIME_WAITING–> RUNNABLE
竞争锁成功,BLOCKED –> RUNNABLE;失败仍然BLOCKED
代码运行完毕,RUNNABLE –> TERMINATED
共享 共享带来的问题 例如java中对静态变量的自增、自减不是原子操作,在字节码上被分为了四步
获取变量值、准备常数、相加、写回
当要写 回的时候若时间片用完,则可能造成数据的错误
1
2
3
4
5
6
7
8
9
10
11
12
13
14
15
16
17
18
19
20
static int counter = 0 ;public static void main (String[] args) throws InterruptedException {Thread t1 = new Thread (() -> {for (int i = 0 ; i < 5000 ; i++) {"t1" );Thread t2 = new Thread (() -> {for (int i = 0 ; i < 5000 ; i++) {"t2" );"{}" , counter);
临界区 一段代码块内如果存在对共享资源的多线程读写操作,称这段代码块为临界区
1
2
3
4
5
6
7
8
9
10
11
12
static int counter = 0 ;static void increment () static void decrement ()
竞态条件 多个线程在临界区内执行,由于代码的执行序列不同而导致结果无法预测,称之为发生了竞态条件
即基于一种可能的实效的观察结果来做出判断或执行某个计算(先检查后执行)
解决方案 阻塞式解决方案:synchronized、Lock
非阻塞式解决方案:原子变量
synchronized 即对象锁 ,采用互斥 的方式,让同一时刻只有一个线程持有锁,其他对象则为阻塞状态 ,
这样就能保证拥有锁 的线程可以安全的执行临界区内的代码,不用担心线程上下文切换
1
2
3
4
5
6
7
8
9
10
11
12
13
14
15
16
17
18
19
20
21
22
23
24
25
static int counter = 0 ;static Object lock = new Object ();public static void main (String[] args) throws InterruptedException {Thread t1 = new Thread (() -> {for (int i = 0 ; i < 5000 ; i++) {synchronized (lock) {"t1" );Thread t2 = new Thread (() -> {for (int i = 0 ; i < 5000 ; i++) {synchronized (lock) {"t2" );"{}" , counter);
synchronized用对象锁保证了临界区内的原子性
面向对象改进
把要保护的共享变量封装到一个类中,类的操作是原子性的
1
2
3
4
5
6
7
8
9
10
11
12
13
14
15
16
17
18
19
20
21
class Room {private int counter = 0 ;public void increment () {synchronized (this ) {public void decrement () {synchronized (this ) {public int getCounter () {synchronized (this ) {return counter;
1
2
3
4
5
6
7
8
9
10
11
12
13
14
15
16
17
18
19
20
public static void main (String[] args) throws InterruptedException {Room room = new Room ();Thread t1 = new Thread (() -> {for (int i = 0 ; i < 5000 ; i++) {"t1" );Thread t2 = new Thread (() -> {for (int i = 0 ; i < 5000 ; i++) {"t2" );"{}" , room.getCounter());
方法上使用synchronized
在成员方法上使用synchronized相当于锁住了this (实例化后的对象)
1
2
3
4
5
6
7
8
9
public void increment () {synchronized (this ) {public synchronized void increment () {
在静态方法上使用synchronized相当于锁住了类对象 (内存中独一份)
1
2
3
4
5
6
7
8
9
10
11
12
class Test {public synchronized static void test () {class Test {public static void test () {synchronized (Test.class) {
ReentrantLock
在后面
变量的线程安全 成员变量和静态变量
没有共享,线程安全
有被共享,只读,线程安全
有被共享,读写,线程不安全
局部变量
局部变量引用的是常量 ,是线程安全
但局部变量引用的是对象 ,若逃离方法的作用范围,则线程不安全,可以使用private或final关键字使局部变量线程安全
常见线程安全的类 多个线程调用它们同一个实例的某个方法时,是线程安全的
String
Integer
StringBuffer
Random
Vector
Hashtable
java.util.concurrent包吓得类
线程安全例子 转账
1
2
3
4
5
6
7
8
9
10
11
12
13
14
15
16
17
18
19
20
21
22
23
24
25
26
27
28
29
30
31
32
33
34
35
36
37
38
39
40
41
42
43
44
45
46
47
48
49
50
51
52
53
54
55
56
57
public class Test {public static void main (String[] args) throws InterruptedException {Account a = new Account (1000 );Account b = new Account (1000 );Thread t1 = new Thread (() -> {for (int i = 0 ; i < 1000 ; i++) {"t1" );Thread t2 = new Thread (() -> {for (int i = 0 ; i < 1000 ; i++) {"t2" );"total:{}" , (a.getMoney() + b.getMoney()));static Random random = new Random ();public static int randomAmount () {return random.nextInt(100 ) + 1 ;class Account {private int money;public Account (int money) {this .money = money;public int getMoney () {return money;public void setMoney (int money) {this .money = money;public void transfer (Account target, int amount) {if (this .money > amount) {this .setMoney(this .getMoney() - amount);
不能通过锁this来解决,因为有两个不同的实例
1
2
3
4
5
6
7
8
9
public void transfer (Account target, int amount) {synchronized (Account.class) {if (this .money > amount) {this .setMoney(this .getMoney() - amount);
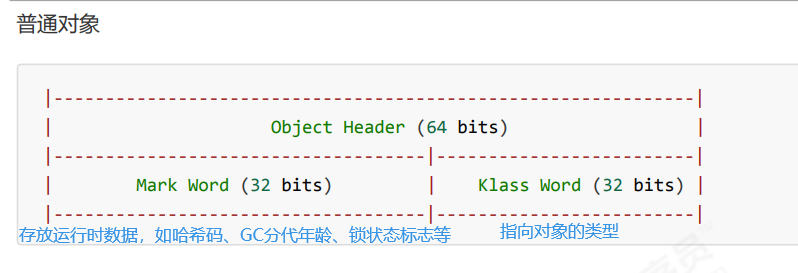
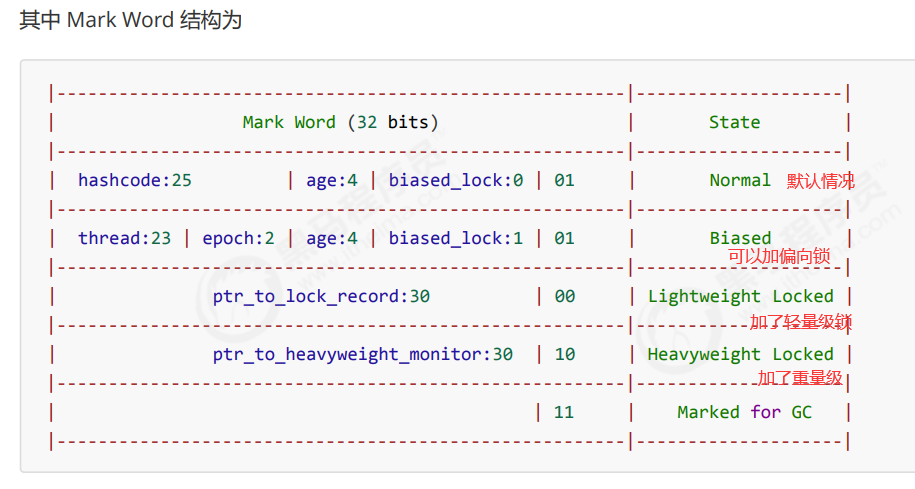
锁 java对象头 对象在内存中可以分为三部分:对象头、实例数据、对齐填充
对象头:如hash码,对象所属的年代,对象锁,锁状态标志,偏向锁(线程)ID,偏向时间等,32位机器里Java对象头一般占有2个机器码
实例数据:存放类的属性数据信息,包括父类的属性对象
对齐填充:使字节对齐,非必须
锁升级
无锁 –> 偏向锁 –> 轻量级锁 –> 重量级锁
升级过程:
线程不多。竞争少时,偏向锁
获取锁时发现Mark Word中不是当前线程ID,CAS自旋获取锁
获取成功,改为当前线程ID,执行代码
获取失败,锁升级为轻量级锁
一个线程获取了轻量级锁,另一个线程尝试获取锁并自旋后仍失败,锁升级为重量级锁
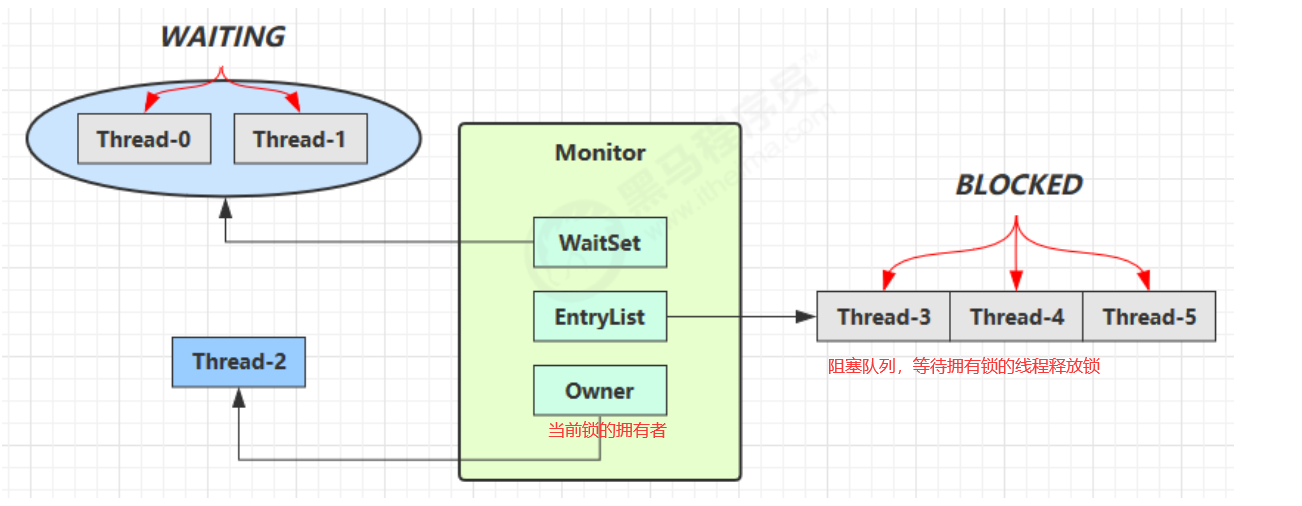
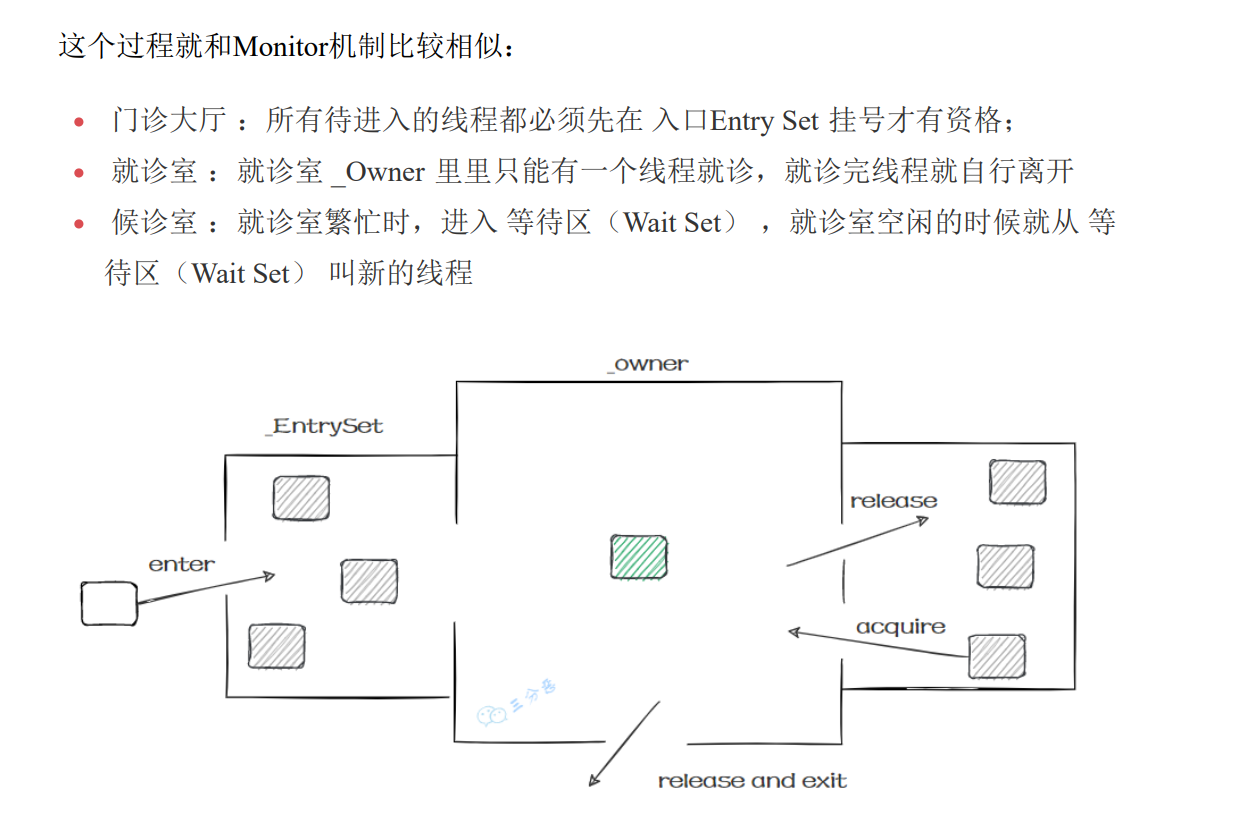
Monitor(重量级锁)原理
锁的类型有:无锁、偏向锁、轻量级锁、重量级锁
如果使用synchronized给对象上锁(重量级 )后,该对象头的Mark word 中就被设置指向Monitor对象 的指针。(原来Mark Word中的信息被放到了Monitor对象中)
Monitor只能有一个Owner
在对象被上锁后,其他线程执行synchronized(obj)就会进入阻塞队列
当Owner执行完代码块的内容后,会唤醒在阻塞队列中的线程,竞争线程时非公平的,由调度器决定
synchronized 必须是进入同一个对象的 monitor 才有上述的效果
不加 synchronized 的对象不会关联监视器,不遵从以上规则
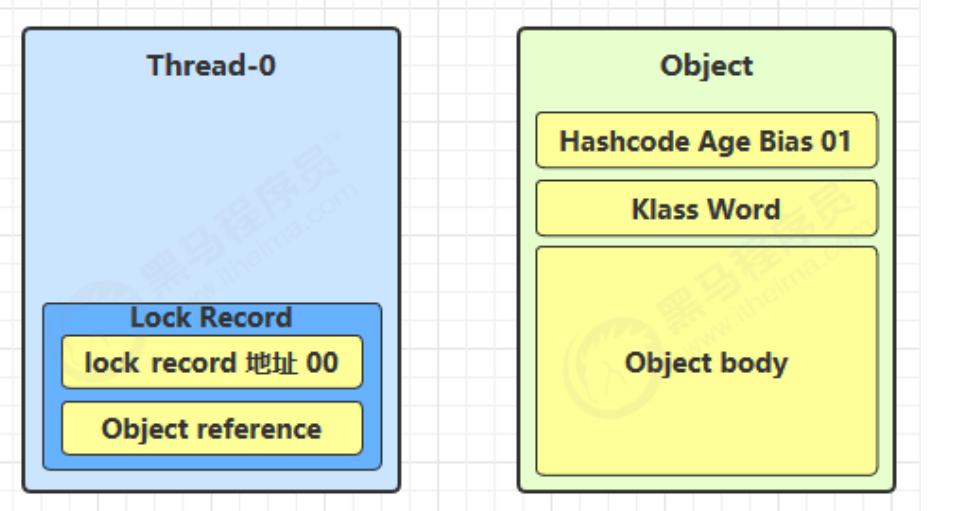
轻量级锁
轻量级锁只是告诉其他线程有线程在用这个资源。
如果线程在加轻量级锁的过程中发现已经被上了轻量级锁,则会从轻量级锁转化为重量级锁
使用场景:如果一个对象虽然有多线程要加锁,但加锁的时间是错开的(也就是没有竞争),那么可以 使用轻量级锁来优化
加轻量级锁对使用者是透明的,语法和加重量级锁一样
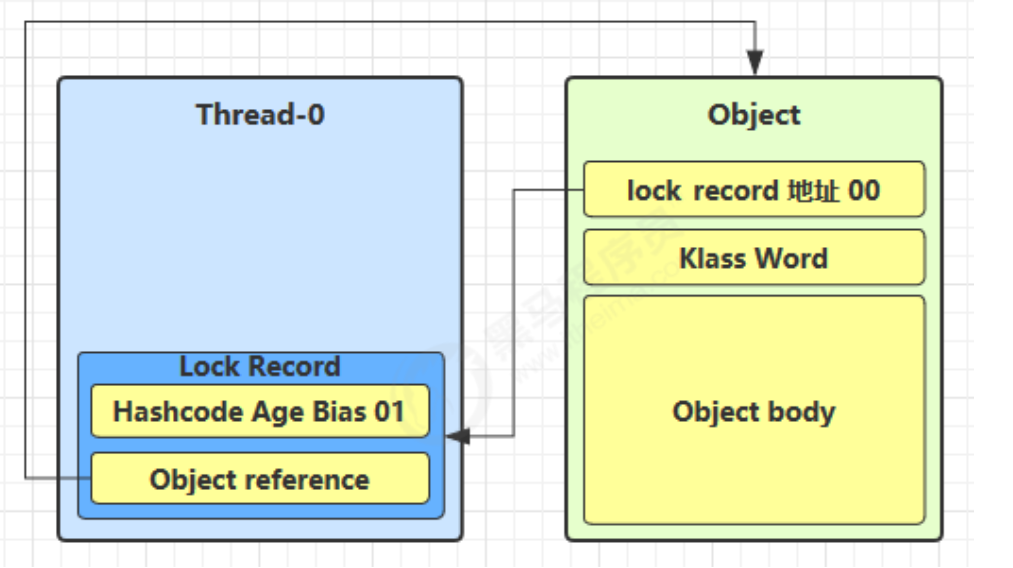
内部实现过程:
创建锁记录(Lock Record)对象,每个线程都的栈帧都会包含一个锁记录的结构,内部可以存储锁定对象的 Mark Word
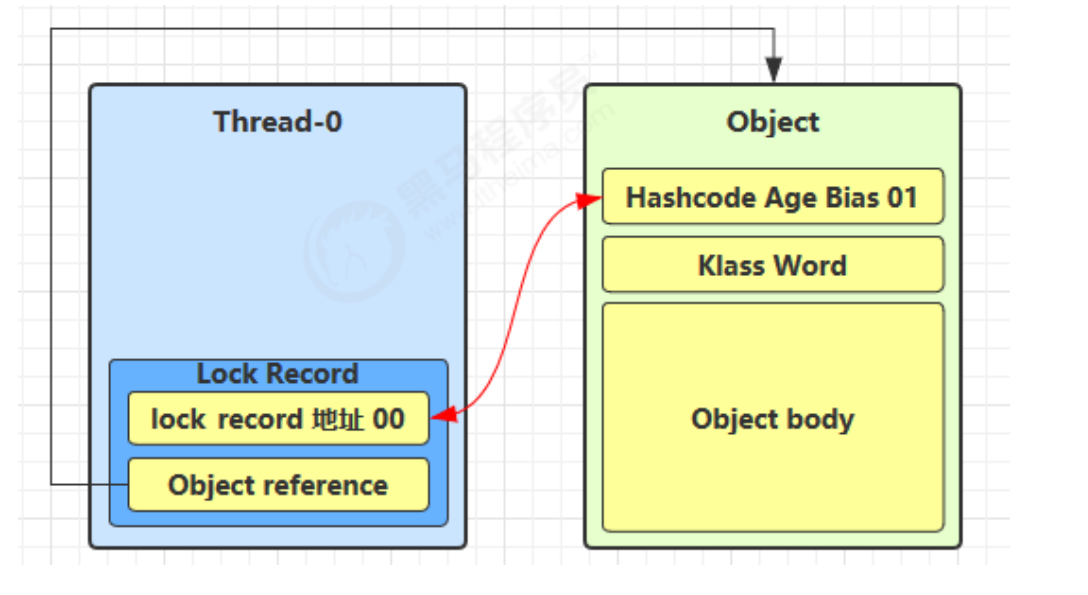
让锁记录中 Object reference 指向锁对象,并尝试用 cas 替换 Object 的 Mark Word,将 Mark Word 的值存 入锁记录
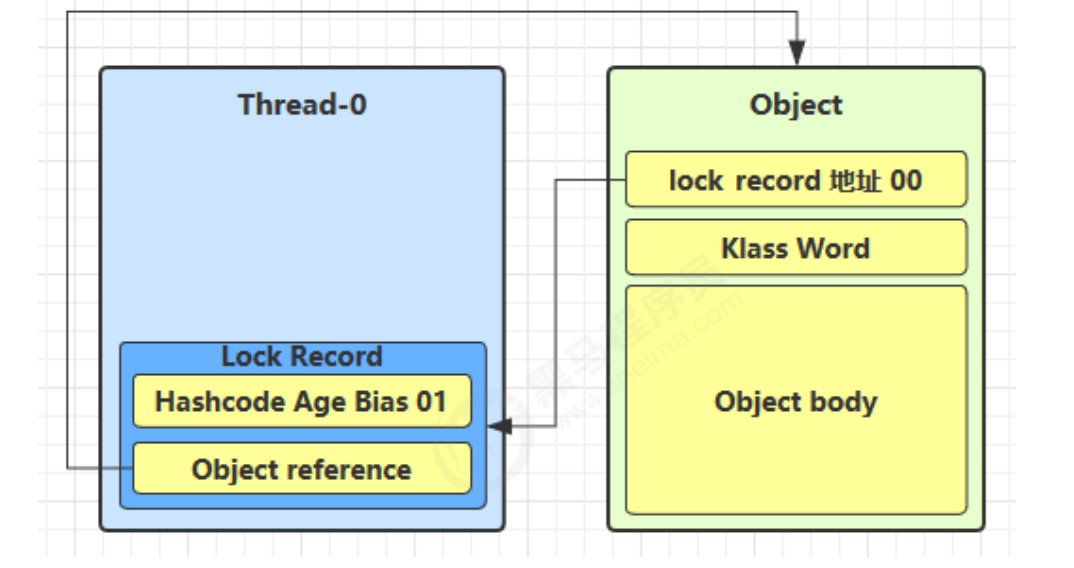
如果 cas 替换成功,对象头中存储了 锁记录地址和状态 00 ,表示由该线程给对象加锁,这时图示如下
如果 cas 失败,有两种情况
如果是其它线程已经持有了该 Object 的轻量级锁,这时表明有竞争,进入锁膨胀过程
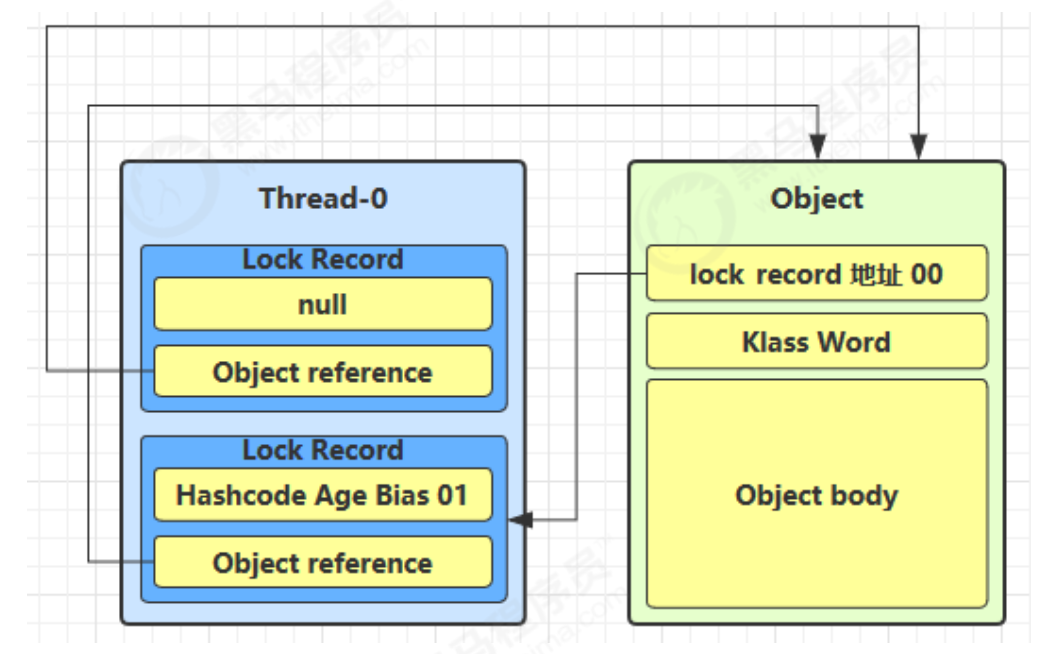
如果是自己执行了 synchronized 锁重入 ,那么再添加一条 Lock Record 作为重入的计数
当退出 synchronized 代码块(解锁时)如果有取值为 null 的锁记录,表示有重入,这时重置锁记录,表示重 入计数减一
当退出 synchronized 代码块(解锁时)锁记录的值不为 null,这时使用 cas 将 Mark Word 的值恢复给对象头
成功,则解锁成功
失败,说明轻量级锁进行了锁膨胀或已经升级为重量级锁,进入重量级锁解锁流程
锁膨胀
如果在尝试加轻量级锁的过程中,CAS 操作无法成功,这时一种情况就是有其它线程为此对象加上了轻量级锁(有竞争),这时需要进行锁膨胀,将轻量级锁变为重量级锁。
锁对象的Mark word会指向Monitor对象
原本给其上锁的线程需要找到Monitor对象来释放锁
自旋优化 相当于对象已经被上锁,后来的线程先不进入阻塞队列(进入阻塞队列是重型操作,耗时),而是重试几次对对象的上锁(自旋),如果这时锁被释放,则上锁成功(自旋成功)。否则则自旋失败,进入阻塞队列
注意:
自旋会占用CPU时间,多核CPU自旋才能发挥优势
自旋是自适应的(成功的次数多则多自旋几次,反之则减少次数)
偏向锁
偏向属于某个线程
当线程数目不多的时候,由于反复获取锁会使得我们的运行效率下降,于是出现了偏向级锁
轻量级锁的问题在于,在没有线程竞争时,每次重入都需要添加锁记录。
偏向锁则在第一次CAS时将线程 ID 设置到对象的 Mark Word 头,之后发现这个线程 ID是自己的就表示没有竞争,不用重新 CAS 。以后只要不发生竞争,这个对象就归该线程所有
偏向锁默认开启,且默认有开启延迟,禁用延迟:-XX:BiasedLockingStartupDelay=0
禁用偏向锁-XX:-UseBiasedLocking
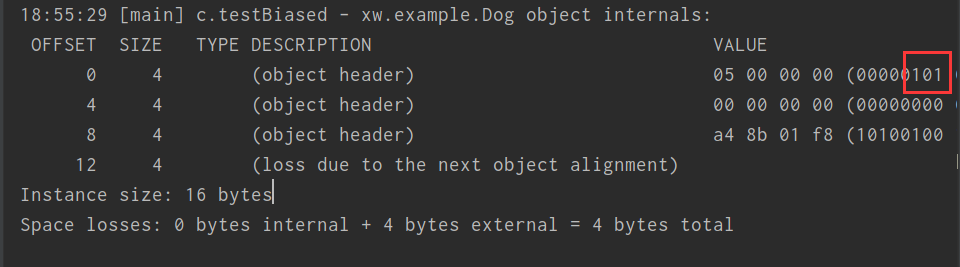
可以用jol查看对象头
1 2 3 4 5 6 <dependency > <groupId > org.openjdk.jol</groupId > <artifactId > jol-core</artifactId > <version > 0.10</version > </dependency >
1
2
3
4
5
6
7
8
9
10
11
public class Test2 {public static Object lock = new Object ();public static void main (String[] args) {Dog dog = new Dog ();class Dog {
注意;
处于偏向锁的对象解锁后,线程 id 仍存储于对象头中
正常状态对象一开始是没有 hashCode 的,第一次调用才生成;如果调用 hashCode 会导致偏向锁被撤销
批量重偏向 重偏向是以类为单位
如果对象被多个线程访问,但没有竞争,偏向线程T1的对象仍有可能重新偏向到线程T2,重偏向会重置对象 的 Thread ID
当这个class类型的实例对象撤销达到20 次后,会执行批量重偏向,所有这个类的实例都会指向新的线程
批量撤销 当撤销偏向锁阈值超过 40 次后,jvm认为在明显多线程竞争剧烈的场景下使用偏向锁是不合适的,整个类的所有对象 都会变为不可偏向的
锁消除 锁消除是发生在编译器级别的一种锁优化方式
如果局部对象只在方法的作用域中有效(没有发生逃逸),不同线程调用时使用的都是不同的对象,使用锁就只会白白浪费资源
这时编译器将其优化,将锁消除
关闭锁消除java -XX:-EliminateLocks -jar benchmarks.jar
多把锁 案例
将锁细分,增加并发度
如果一个线程需要同时获取多把锁,容易发生死锁
1
2
3
4
5
6
7
8
9
10
11
12
13
14
15
16
17
18
19
20
21
22
23
24
25
26
27
28
29
30
31
32
33
34
35
36
37
38
39
40
41
42
43
44
45
46
47
48
@Slf4j(topic = "c.Test6") public class Test6 {public static final Object lock = new Object ();public static void main (String[] args) throws InterruptedException {BigRoom bigRoom = new BigRoom ();new Thread (() -> {"t1" ).start();new Thread (() -> {"t2" ).start();@Slf4j(topic = "c.BigRoom") class BigRoom {private final Object studyRoom = new Object ();private final Object sleepRoom = new Object ();public void sleep () {synchronized (sleepRoom) {"sleeping..." );try {2000 );catch (InterruptedException e) {public void study () {synchronized (studyRoom) {"study..." );try {2000 );catch (InterruptedException e) {
活跃性 死锁
两个或两个以上的进程在执行过程中,由于竞争资源或者由于彼此通信而造成的一种阻塞
代表性问题:哲学家进餐
死锁产生的条件
互斥 :一个资源一次只能给一个线程使用不可剥夺 :资源只能由资源持有者释放请求和保持 :进程申请它所需的一部分资源,并继续占用以获取的资源循环等待 :多个线程都有一些资源,但所需的另一部分资源被其他线程占了,形成一个等待的环
避免死锁
至少破坏死锁产生的其中一个条件
定位死锁 方法1:
方法2:
打开jdk/bin目录下的jconsole.exe工具
连接上进程
查看线程,点击检测死锁,就会把有死锁的线程展示出来
活锁
活锁出现在两个线程互相改变对方的结束条件,最后谁也无法结束
和死锁的区别:出现死锁,线程都被阻塞住了;出现活锁:线程仍在运行,但始终结束不了
实例
1
2
3
4
5
6
7
8
9
10
11
12
13
14
15
16
17
18
19
20
21
22
23
24
25
26
27
28
29
30
public class Test8 {static volatile int count = 10 ;public static void main (String[] args) {new Thread (() -> {while (count > 0 ) {try {200 );catch (InterruptedException e) {"count: {}" , count);"t1" ).start();new Thread (() -> {while (count < 20 ) {try {200 );catch (InterruptedException e) {"count: {}" , count);"t2" ).start();
饥饿
由于优先级太低,始终得不到CPU调度执行,也无法结束
ReentrantLock
可重入锁
可重入:同一个线程首次获得线程后还没有释放,第二次申请锁不会被挡住
不可重入:第二次申请锁会把自己也挡在外面
相较于synchronized,具备如下特点:
可中断
可设置超时时间
可设置为公平锁
支持多个条件变量(多个阻塞队列,不同条件而阻塞的进不同的阻塞队列)
可打断
使用方法**lockInterruptibly()**方法加可打断的锁
lock()方法加的是不可打断的锁
实例
1
2
3
4
5
6
7
8
9
10
11
12
13
14
15
16
17
18
19
20
21
22
23
24
25
private static ReentrantLock lock = new ReentrantLock ();public static void main (String[] args) throws InterruptedException {Thread t1 = new Thread (() -> {try {catch (InterruptedException e) {"被打断了" );return ;try {"获取到锁" );finally {"t1" );1000 );
可设置超时时间
带超时时间的申请锁,解决死锁问题
tryLock()、tryLock(long timeout, TimeUnit unit)
只尝试获取一次锁,在timeout时间内都会尝试获取锁
案例
1
2
3
4
5
6
7
8
9
10
11
12
13
14
15
16
17
18
19
20
21
22
23
24
25
26
27
28
29
30
31
private static ReentrantLock lock = new ReentrantLock ();public static void main (String[] args) throws InterruptedException {Thread t1 = new Thread (() -> {"启动。。。" );try {if (!lock.tryLock(2 , TimeUnit.SECONDS)) {"获取锁失败" );return ;catch (InterruptedException e) {try {"获取到锁" );finally {"t1" );"获取到锁" );try {1000 );finally {
可设置为公平锁
不公平锁:获取锁的顺序和来的顺序无关
公平锁:先来先得
公平锁一般没有必要,会降低并发度
公平锁默认关闭。开启公平锁
1 private static ReentrantLock lock = new ReentrantLock (true );
支持多个条件变量
多个不同的阻塞队列
1 2 3 4 5 6 7 8 Condition condition = lock.newCondition();
JMM
Java Memary Model(java内存模型)
定义了主存、工作内存抽象概念,底层对应着 CPU 寄存器、缓存、硬件内存、 CPU 指令优化等。
JMM体现在以下几个方面:
原子性:指令不会受到线程上下文切换的影响
可见性:指令不会受 cpu 缓存的影响(对共享变量的修改对其他线程立即可见)
有序性:指令不会受 cpu 指令并行优化的影响(指令顺序执行)
可以通过synchronized保证代码块的原子性,volatile保证可见性和有序性
可见性
如果线程频繁从主存中获取某个值,就会形成缓存,减少对主存的访问,提高效率
但会出现内存中的值更新了,使得缓存中的值和内存中的不一致
从而出现可见性问题
示例
t线程无法退出循环
1
2
3
4
5
6
7
8
9
10
11
12
13
14
15
16
17
18
public class Test9 {static boolean run = true ;public static void main (String[] args) throws InterruptedException {Thread t = new Thread (() -> {while (run) {1000 );"stop t" );false ;
解决方式:
volatile关键字:表示变量是易变的,每次都从内存中读取(轻量)
1 volatile static boolean run = true ;
给代码块加锁(重量)
synchronized规定,线程在加锁时, 先清空工作内存 →在主内存中拷贝最新变量的副本到工作内存 →执行完代码→将更改后的共享变量的值刷新到主内存中→释放互斥锁。
有序性
指令重排:JVM 会在不影响正确性的前提下,可以调整语句的执行顺序(流水线),在多线程下有可能会影响正确性
通过volatile关键字,可以进制指令重排
volatile原理:
读屏障:保证在该屏障之后,对共享变量的读取,加载的是主存中最新数据
写屏障:保证在该屏障之前的,对共享变量的改动,都同步到主存当中
原子性
通过同步代码块synchronized来保证原子性
synchronized用法:
加在实例方法上:给当前实例对象加锁
加在静态方法上:给当前class类加锁
加在代码块上:给指定的对象或类加锁
原理:
ObjectMonitor有两个队列: WaitSet、 EntryList,用来保存ObjectWaiter 对象列 表。
_owner,获取 Monitor 对象的线程进入 _owner 区时, _count + 1。如果线程调用 了 wait() 方法,此时会释放 Monitor 对象, _owner 恢复为空, _count - 1。同时 该等待线程进入 _WaitSet 中,等待被唤醒。
monitorenter,在判断拥有同步标识 ACC_SYNCHRONIZED 抢先进入此方法的线 程会优先拥有 Monitor 的 owner ,此时计数器 +1。
monitorexit,当执行完退出后,计数器 -1,归 0 后被其他进入的线程获得。
dcl问题
double-checked locking 单例模式
1
2
3
4
5
6
7
8
9
10
11
12
13
14
15
public final class Singleton {private Singleton () { }private static Singleton INSTANCE = null ;public static Singleton getInstance () {if (INSTANCE == null ) { synchronized (Singleton.class) {if (INSTANCE == null ) { new Singleton ();return INSTANCE;
创建对象的过程不是原子操作 ,
在单线程下没有问题,但多线程下可能会出现问题,
在创建对象的时候发生了重排序,JVM先将对象分配给了变量,再调用构造方法;其他线程判断INSTANCE != null从而使用了没有初始化完成的对象
解决方式: 给INSTANCE添加volatile关键字,使之不会被重排序
单例模式
饿汉/懒汉实现单例模式
1 2 3 4 5 6 7 8 9 10 11 12 13 14 15 16 17 18 19 20 21 22 23 24 25 26 27 28 public final class Singleton implements Serializable {private Singleton () { }private static volatile Singleton INSTANCE = null ;public static Singleton getInstance () {if (INSTANCE == null ) { synchronized (Singleton.class) {if (INSTANCE == null ) { new Singleton ();return INSTANCE;public Object readResovle () {return INSTANCE;
枚举实现单例
INSTANCE相当于静态成员对象,属于懒汉式
1
2
3
enum Singleton {
静态内部类实现单例
1
2
3
4
5
6
7
8
9
10
11
12
13
public final class Singleton {private Singleton () { }private static class LazyHolder {static final Singleton INSTANCE = new Singleton ();public static Singleton getInstance () {return LazyHolder.INSTANCE;
乐观锁(无锁) 原子变量
如AtomicInteger(原子整数)
案例,取款
1
2
3
4
5
6
7
8
9
10
11
12
13
14
15
16
17
18
19
20
21
22
23
24
25
26
class AccountSafe implements Account1 {private AtomicInteger balance;public AccountSafe (int balance) {this .balance = new AtomicInteger (balance);@Override public synchronized Integer getBalance () {return balance.get();@Override public synchronized void withdraw (Integer amount) {while (true ) {int prev = balance.get();int next = prev - amount;if (balance.compareAndSet(prev, next)) {break ;
CAS和volatile关系
获取共享变量时,为了保证该变量的可见性,需要使用 volatile 修饰。
它可以用来修饰成员变量和静态成员变量,他可以避免线程从自己的工作缓存中查找变量的值,必须到主存中获取 它的值,线程操作 volatile 变量都是直接操作主存。即一个线程对 volatile 变量的修改,对另一个线程可见。
CAS 必须借助 volatile 才能读取到共享变量的最新值来实现【比较并交换】的效果
效率 无锁效率高于有锁
synchronized 会让线程在没有获得锁的时候,发生上下文切换,进入阻塞
上下文切换的代价比较高,在有多个核心的情况下,无锁没有切换的开销
无锁情况下,线程仍然在运行,需要额外 CPU 的支持,如果没有额外 CPU 的支持,没有分到时间片,还是会上下文切换
CAS特点
适用于线程数少、多核 CPU 的场景下 基于乐观锁,不怕别的线程来改
体现的是无锁并发、无阻塞并发
如果竞争激烈,可以想到重试必然频繁发生,反而效率会受影响
线程安全工具类 原子整数
JUC并发包提供的:AtomicBoolean、 AtomicInteger、 AtomicLong
原子整数的api都是基于CAS(compareAndSet)完成的
1
2
3
4
5
6
7
8
9
10
11
12
13
14
15
16
17
18
19
20
21
public static void main (String[] args) {AtomicInteger i = new AtomicInteger (0 );5 ));5 ));10 );
原子引用
JUC提供的:AtomicReference、 AtomicMarkableReference 、 AtomicStampedReference
案例
1
2
3
4
5
6
7
8
9
10
11
12
13
14
15
16
17
18
19
20
21
22
23
24
25
26
class DecimalAccountCas implements Account1 {private AtomicReference<BigDecimal> balance;public DecimalAccountCas (BigDecimal balance) {this .balance = new AtomicReference <>(balance);@Override public Integer getBalance () {BigDecimal bigDecimal = balance.get();return bigDecimal.intValue();@Override public void withdraw (Integer amount) {while (true ) {BigDecimal prev = balance.get();BigDecimal next = prev.subtract(new BigDecimal (amount));if (balance.compareAndSet(prev, next)) {break ;
ABA问题 ABA 问题的过程是当有两个线程 T1 和 T2 从内存中获取到值A,线程 T2 通过某些操作把内存值修改为B,然后又经过某些操作将值修改为回值A,T2退出。线程 T1 进行操作的时候 ,使用预期值同内存中的值比较,此时均为A,修改成功退出。但是此时的A以及不是原先的A了
案例
使用AtomicReference
1
2
3
4
5
6
7
8
9
10
11
12
13
14
15
16
17
18
19
20
21
22
23
static AtomicReference<String> ref = new AtomicReference <>("A" );public static void main (String[] args) throws InterruptedException {String prev = ref.get();1000 );"C" ));public static void other () throws InterruptedException {new Thread (() -> {"B" ));"t1" ).start();500 );new Thread (() -> {"A" ));"t2" ).start();
解决方式1
使用AtomicStampedReference ,类似MySQl的悲观锁,通过版本号来判断有没有被改过
案例
1
2
3
4
5
6
7
8
9
10
11
12
13
14
15
16
17
18
19
20
21
22
23
24
25
26
27
static AtomicStampedReference<String> ref = new AtomicStampedReference <>("A" , 0 );public static void main (String[] args) throws InterruptedException {String prev = ref.getReference();int stamp = ref.getStamp();"当前版本号" + stamp);1000 );"过了一段时间后的版本号" + ref.getStamp());"C" , stamp, stamp + 1 ));public static void other () throws InterruptedException {new Thread (() -> {int stamp = ref.getStamp();"B" , stamp, stamp + 1 ));"t1" ).start();500 );new Thread (() -> {int stamp = ref.getStamp();"A" , stamp, stamp + 1 ));"t2" ).start();
1 2 3 4 5 6 0 true true 2 false
解决方式2
当只关心是否被修改过,而不关心被修改了几次时,使用AtomicMarkableReference
案例
1
2
3
4
5
6
7
8
9
10
11
12
13
14
15
16
17
18
19
20
21
22
static AtomicMarkableReference<String> ref = new AtomicMarkableReference <>("A" , false );public static void main (String[] args) throws InterruptedException {String prev = ref.getReference();boolean marked = ref.isMarked();"是否被更改过" + marked);1000 );"是否被更改过" + ref.isMarked());"C" , marked,!marked));public static void other () throws InterruptedException {new Thread (() -> {"B" , ref.isMarked(), !ref.isMarked()));"t1" ).start();
原子数组
JUC提供的:AtomicIntegerArray、AtomicLongArray、AtomicReferenceArray
案例
1
2
3
4
5
6
7
8
9
10
11
12
13
14
15
16
17
18
19
20
21
22
23
24
25
26
27
28
29
30
31
32
33
34
35
36
37
38
39
40
41
42
43
44
45
46
47
48
49
50
public static void main (String[] args) {new int [10 ],new AtomicIntegerArray (10 ),private static <T> void demo ( Supplier<T> arraySupplier, Function<T, Integer> lengthFun, BiConsumer<T, Integer> putConsumer, Consumer<T> printConsumer ) {new ArrayList <>();T array = arraySupplier.get();int length = lengthFun.apply(array);for (int i = 0 ; i < length; i++) {new Thread (() -> {for (int j = 0 ; j < 10000 ; j++) {try {catch (InterruptedException e) {
1
2
3
// 控制台 8670 , 8543 , 8522 , 8501 , 8475 , 8479 , 8500 , 8436 , 8621 , 8760 ]10000 , 10000 , 10000 , 10000 , 10000 , 10000 , 10000 , 10000 , 10000 , 10000 ]
字段更新器
保证引用类型内部属性赋值的原子性
JUC提供的:AtomicReferenceFieldUpdater // 域 字段 、AtomicIntegerFieldUpdater、AtomicLongFieldUpdater
案例
1
2
3
4
5
6
7
8
9
10
11
12
13
14
15
16
17
18
19
20
21
22
public class Test15 {public static void main (String[] args) {Student student = new Student ();AtomicReferenceFieldUpdater updater = AtomicReferenceFieldUpdater.newUpdater(Student.class, String.class, "name" );null , "张三" );class Student {volatile String name;@Override public String toString () {return "Student{" +"name='" + name + '\'' +'}' ;
原子累加器
JUC提供的:DoubleAccumulator、DoubleAdder、LongAccumulator、LongAdder
原子累加器的速度比原子整数要快
在有竞争时,设置多个累加单元,Therad-0 累加 Cell[0],而 Thread-1 累加 Cell[1]… 最后将结果汇总。这样它们在累加时操作的不同的 Cell 变量,因此减少了 CAS 重试失败,从而提高性 能。
案例
1
2
3
4
5
6
7
8
9
10
11
12
13
14
15
16
17
18
19
20
21
22
23
24
25
26
27
28
29
30
31
32
33
34
public static void main (String[] args) {new AtomicLong (0 ),new LongAdder (),private static <T> void demo (Supplier<T> adderSupplier, Consumer<T> action) {T adder = adderSupplier.get();long start = System.nanoTime();new ArrayList <>();for (int i = 0 ; i < 4 ; i++) {new Thread (() -> {for (int j = 0 ; j < 500000 ; j++) {try {catch (InterruptedException e) {long end = System.nanoTime();" cost:" + (end - start) / 1000_000 );
Unsafe
Unsafe 对象提供了非常底层的,操作内存、线程的方法 ,Unsafe 对象不能直接调用,只能通过反射获得
获取unsafe 1 2 3 4 5 6 7 8 9 public static void main (String[] args) throws NoSuchFieldException, IllegalAccessException {Field theUnsafe = Unsafe.class.getDeclaredField("theUnsafe" );true );Unsafe unsafe = (Unsafe) theUnsafe.get(null );
unsafe的cas操作
有compareAndSwapInt、compareAndSwapLong、compareAndSwapObject
案例:通过unsafe修改域
1 2 3 4 5 6 7 8 9 10 11 12 13 14 15 16 17 18 19 20 21 22 23 24 public class Test17 {public static void main (String[] args) throws NoSuchFieldException, IllegalAccessException {Field theUnsafe = Unsafe.class.getDeclaredField("theUnsafe" );true );Unsafe unsafe = (Unsafe) theUnsafe.get(null );long idOffset = unsafe.objectFieldOffset(Teacher.class.getDeclaredField("id" ));long nameOffset = unsafe.objectFieldOffset(Teacher.class.getDeclaredField("name" ));Teacher teacher = new Teacher ();0 , 1 );null , "zs" );@Data class Teacher {volatile int id;volatile String name;
伪共享 CPU会将内存中的数据读到缓存中来提高效率,
缓存以缓存行为单元,
如果某个CPU改变了数据,其他 CPU 核心对应的整个缓存行必须失效
@sun.misc.Contended 原理是在使用此注解的对象或字段的前后各增加 128 字节大小的 padding,从而让 CPU 将对象预读至缓存时占用不同的缓存行 ,这样,不会造成对方缓存行的失效
不可变 如果一个对象在不能够修改其内部状态(属性),那么它就是线程安全的
不可变类就是不能修改其内部状态的类,如日期转换类SimpleDateFormat是可变的,而DateTimeFormatter是不可变类,String也是不可变类
final final 修饰保证了该属性是只读的,不能修改
保证了该类中的方法不能被覆盖,防止子类无意间破坏不可变性
设置final变量原理:给final赋值的时候,通过写屏障,保证在其它线程读到 它的值时不会出现为 0 的情况
获取final变量原理:会被复制一份到其他类的方法栈/常量池中,没有共享的问题,性能更高
无状态 没有成员变量称为无状态,没有线程安全问题
工具 自定义线程池 带任务队列,线程阻塞队列,超时时间
策略模式:当任务队列满了该怎么做
1 2 3 4 5 6 7 8 9 10 11 12 13 14 15 16 17 18 19 20 21 22 23 24 25 26 27 28 29 30 31 32 33 34 35 36 37 38 39 40 41 42 43 44 45 46 47 48 49 50 51 52 53 54 55 56 57 58 59 60 61 62 63 64 65 66 67 68 69 70 71 72 73 74 75 76 77 78 79 80 81 82 83 84 85 86 87 88 89 90 91 92 93 94 95 96 97 98 99 100 101 102 103 104 105 106 107 108 109 110 111 112 113 114 115 116 117 118 119 120 121 122 123 124 125 126 127 128 129 130 131 132 133 134 135 136 137 138 139 140 141 142 143 144 145 146 147 148 149 150 151 152 153 154 155 156 157 158 159 160 161 162 163 164 165 166 167 168 169 170 171 172 173 174 175 176 177 178 179 180 181 182 183 184 185 186 187 188 189 190 191 192 193 194 195 196 197 198 199 200 201 202 203 204 205 206 207 208 209 210 211 212 213 214 215 216 217 218 219 220 221 222 223 224 225 226 227 228 229 230 231 232 233 234 235 236 237 238 239 240 241 242 243 244 245 246 247 248 249 250 251 252 @Slf4j(topic = "c.Test21") public class Test21 {public static void main (String[] args) {ThreadPool threadPool = new ThreadPool (1 , 1000 , TimeUnit.MILLISECONDS, 1 , (queue, task) -> {for (int i = 0 ; i < 3 ; i++) {int j = i;try {1000 );catch (InterruptedException e) {"{}" , j);@Slf4j(topic = "c.ThreadPool") class ThreadPool {new HashSet <>();int coreSize;long timeout;private RejectPolicy<Runnable> rejectPolicy;public ThreadPool (int coreSize, long timeout, TimeUnit unit, int queueCapacity, RejectPolicy<Runnable> rejectPolicy) {this .coreSize = coreSize;this .timeout = timeout;this .unit = unit;this .taskQueue = new BlockingQueue <>(queueCapacity);this .rejectPolicy = rejectPolicy;public void execute (Runnable task) {synchronized (workers) {if (workers.size() < coreSize) {Worker worker = new Worker (task);"新增worker{}" , worker);else {class Worker extends Thread {private Runnable task;public Worker (Runnable task) {this .task = task;@Override public void run () {while (task != null || (task = taskQueue.take(timeout, unit)) != null ) {try {"正在执行..{}" , task);catch (Exception e) {finally {null ;synchronized (workers) {"移除worker:{}" , workers);this );@FunctionalInterface interface RejectPolicy <T>{void reject (BlockingQueue<T> queue, T task) ;@Slf4j(topic = "c.BlockingQueue") class BlockingQueue <T> {new ArrayDeque <>();int capacity;ReentrantLock lock = new ReentrantLock ();Condition fullWaitSet = lock.newCondition();Condition emptyWaitSet = lock.newCondition();public BlockingQueue (int capacity) {this .capacity = capacity;public T take () {try {while (queue.isEmpty()) {T t = queue.removeFirst();return t;catch (InterruptedException e) {finally {return null ;public T take (long timeout, TimeUnit unit) {try {long nanos = unit.toNanos(timeout);while (queue.isEmpty()) {if (nanos <= 0 ) {return null ;T t = queue.removeFirst();return t;catch (InterruptedException e) {finally {return null ;public void put (T task) {try {while (queue.size() >= capacity) {"等待加入队列{}" , task);"加入队列{}" , task);catch (InterruptedException e) {finally {public boolean put (T task, long timeout, TimeUnit unit) {try {long nanos = unit.toNanos(timeout);while (queue.size() >= capacity) {if (nanos <= 0 ) {return false ;catch (InterruptedException e) {finally {return true ;public int size () {try {return queue.size();finally {public void tryPut (RejectPolicy<T> rejectPolicy, T task) {try {if (queue.size() >= capacity) {this , task);else {"加入队列{}" , task);finally {
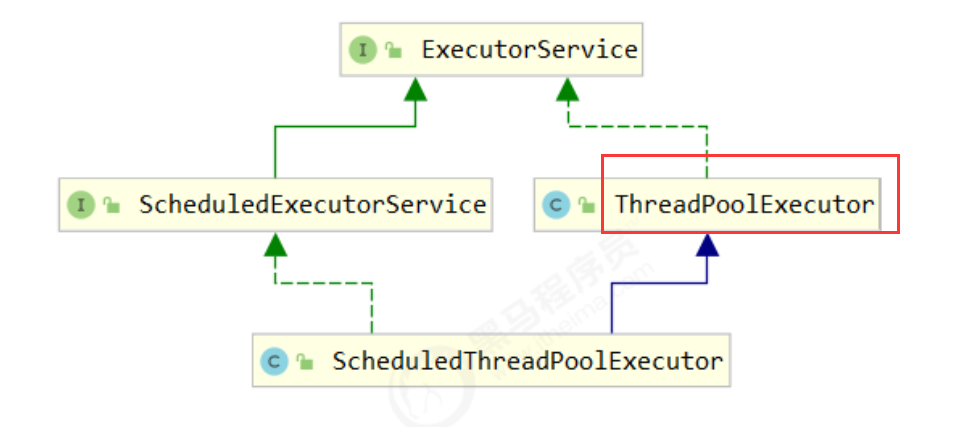
ThreadPoolExcutor
线程池状态 ThreadPoolExecutor 使用 int 的高 3 位来表示线程池状态,低 29 位表示线程数量
状态名
高3位
接收新任务
处理阻塞队列任务
说明
RUNNING
111
Y
Y
SHUTDOWN
000
N
Y
不会接收新任务,但会处理阻塞队列剩余 任务
STOP
001
N
N
会中断正在执行的任务,并抛弃阻塞队列 任务
TIDYING
010
-
-
任务全执行完毕,活动线程为 0 即将进入 终结
TERMINATED
011
-
-
终结状态
将状态信息和线程数量保存在同一个整数中是为了可以用1一次cas操作进行赋值
构造函数 1 2 3 4 5 6 7 public ThreadPoolExecutor (int corePoolSize, int maximumPoolSize, long keepAliveTime, TimeUnit unit, BlockingQueue<Runnable> workQueue, ThreadFactory threadFactory, RejectedExecutionHandler handler)
corePoolSize 核心线程数目 (最多保留的线程数)
keepAliveTime 生存时间 - 针对救急线程
unit 时间单位 - 针对救急线程
workQueue 阻塞队列
threadFactory 线程工厂 - 可以为线程创建时起个好名字
handler 拒绝策略
当线程池中的任务数超过了队列大小时,会创建救急线程来执行任务。当救急线程数量达到最大创建的数量时,仍然有新任务,此时则会执行拒绝策略
救急线程有生存时间,而核心线程没有
拒绝策略
AbortPolicy 让调用者抛出 RejectedExecutionException 异常,这是默认策略
CallerRunsPolicy 让调用者运行任务
DiscardPolicy 放弃本次任务
DiscardOldestPolicy 放弃队列中最早的任务,本任务取而代
线程工厂 newFixedThreadPool 固定大小线程池
核心线程数等于最大线程数,因此没有救急线程
阻塞队列是无界的,可以放任意数量的任务
适用于任务量已知,相对耗时的任务
1 2 3 4 5 6 7 8 9 10 11 12 13 14 15 16 17 18 19 20 21 22 23 24 25 @Slf4j(topic = "c.Test22") public class Test22 {public static void main (String[] args) {ExecutorService pool = Executors.newFixedThreadPool(2 , new ThreadFactory () {private AtomicInteger t = new AtomicInteger (1 );@Override public Thread newThread (Runnable r) {return new Thread (r, "myPool_t" + t.getAndIncrement());"1" );"2" );"3" );
newCachedThreadPool 缓冲线程
核心线程数为0,最大线程数为Integer.MAX_VALUE,因此全部线程都为救急线程(生存周期60s)
只有当有线程来线程池取任务时,才能放任务到线程池中
适合任务数比较密集,但每个任务执行时间较短的情况
1 2 3 4 5 6 7 8 9 10 11 12 13 14 15 16 17 18 19 20 21 22 23 24 25 26 27 28 29 30 31 32 33 34 public static void main (String[] args) throws InterruptedException {new SynchronousQueue <>();new Thread (() -> {try {"putting {} " , 1 );1 );"{} putted..." , 1 );"putting...{} " , 2 );2 );"{} putted..." , 2 );catch (InterruptedException e) {"t1" ).start();1000 );new Thread (() -> {try {"taking {}" , 1 );catch (InterruptedException e) {"t2" ).start();1000 );new Thread (() -> {try {"taking {}" , 2 );catch (InterruptedException e) {"t3" ).start();
newSingleThreadExecutor 单例线程池
线程数固定为 1,任务数多于 1 时,会放入无界队列排队
与自己创建一个线程执行任务的区别:
自己创建一个单线程串行执行任务,如果任务执行失败而终止那么没有任何补救措施,而线程池还会新建一 个线程,保证池的正常工作
e 应用的是装饰器模式,只对外暴露了 ExecutorService 接口,因 此不能调用 ThreadPoolExecutor 中特有的方法
1 2 3 4 5 6 7 8 9 public static void main (String[] args) throws InterruptedException {ExecutorService pool = Executors.newSingleThreadExecutor();int i = 1 / 0 ;"仍然继续执行" );
newScheduledThreadPool 定时任务线程池
可以延时执行任务和定时执行任务(隔一段时间执行一次),通过设置线程数,使得若一个任务执行时间长/执行出错,不会影响其他的定时任务
1 2 3 4 5 6 7 8 9 10 11 12 13 14 15 16 17 18 public static void main (String[] args) throws InterruptedException, ExecutionException {ScheduledExecutorService pool = Executors.newScheduledThreadPool(2 );"task1" );try {3000 );catch (InterruptedException e) {1 , TimeUnit.SECONDS);"task2" );1 , TimeUnit.SECONDS);
1 2 3 4 5 6 7 8 9 10 11 12 public static void main (String[] args) throws InterruptedException, ExecutionException {ScheduledExecutorService pool = Executors.newScheduledThreadPool(2 );"start..." );"running..." );1 , 1 , TimeUnit.SECONDS);
应用:每周五18点执行定时任务
1 2 3 4 5 6 7 8 9 10 11 12 13 14 15 16 17 18 19 20 21 public static void main (String[] args) throws InterruptedException, ExecutionException {LocalDateTime now = LocalDateTime.now();LocalDateTime time = now.withHour(18 ).withMinute(0 ).withSecond(0 ).withNano(0 ).with(DayOfWeek.FRIDAY);if (now.compareTo(time) > 0 ) {1 );ScheduledExecutorService pool = Executors.newScheduledThreadPool(1 );long initialDelay = Duration.between(now, time).toMillis();long period = 1000 * 60 * 60 * 24 * 7 ;"running" );
执行任务方法 void execute(Runnable command)
执行任务
<T>Future<T> submit((Callable<T> task)
提交任务 task,用返回值 Future 获得任务执行结果
1 2 3 4 5 6 7 8 9 10 11 12 public static void main (String[] args) throws InterruptedException, ExecutionException {ExecutorService pool = Executors.newFixedThreadPool(2 );"running.." );1000 );return "ok" ;
invokeAll
提交所有任务
1 2 3 4 5 6 7 8 9 10 11 12 13 14 15 16 17 18 19 20 21 22 23 24 25 26 27 28 public static void main (String[] args) throws InterruptedException, ExecutionException {ExecutorService pool = Executors.newFixedThreadPool(2 );"begin" );1000 );return "1" ;"begin" );500 );return "2" ;"begin" );2000 );return "3" ;try {catch (InterruptedException | ExecutionException e) {
invokeAny
将最先执行完成的任务的返回值返回,其他任务取消
1 2 3 4 5 6 7 8 9 10 11 12 13 14 15 16 17 18 19 20 21 22 23 24 25 public static void main (String[] args) throws InterruptedException, ExecutionException {ExecutorService pool = Executors.newFixedThreadPool(2 );String result = pool.invokeAny(Arrays.asList("begin" );1000 );"end" );return "1" ;"begin" );500 );"end" );return "2" ;"begin" );2000 );"end" );return "3" ;
关闭线程池方法 shutdown
将线程池状态改为SHUTDOWN,不再接收新任务,执行完已提交的任务
1 2 3 4 5 6 7 8 9 10 11 12 13 14 15 16 17 18 19 20 21 22 23 24 25 26 27 28 29 30 31 32 33 34 35 36 public static void main (String[] args) throws InterruptedException, ExecutionException {ExecutorService pool = Executors.newFixedThreadPool(2 );try {1000 );"task 1 running" );catch (InterruptedException e) {return 1 ;try {1000 );"task 2 running" );catch (InterruptedException e) {return 2 ;try {1000 );"task 3 running" );catch (InterruptedException e) {return 3 ;"关闭线程池" );
1 2 3 4 5 15 :17 :25 [main] c.Test22 - 关闭线程池15 :17 :26 [pool-1-thread-2] c.Test22 - task 2 running15 :17 :26 [pool-1-thread-1] c.Test22 - task 1 running15 :17 :27 [pool-1-thread-2] c.Test22 - task 3 running
shutdownNow
将线程池状态改为STOP,不再接收新任务,用interrupt打断正在执行的线程,将已提交的任务全部返回
1 2 3 4 5 6 7 8 9 10 11 12 13 14 15 16 17 18 19 20 21 22 23 24 25 26 27 28 29 30 31 32 33 34 35 36 37 public static void main (String[] args) throws InterruptedException, ExecutionException {ExecutorService pool = Executors.newFixedThreadPool(2 );try {1000 );"task 1 running" );catch (InterruptedException e) {return 1 ;try {1000 );"task 2 running" );catch (InterruptedException e) {return 2 ;try {1000 );"task 3 running" );catch (InterruptedException e) {return 3 ;"立即关闭线程池" );"{}" , runnables);
1 2 3 4 15 :24 :57 [main] c.Test22 - 关闭线程池15 :24 :57 [main] c.Test22 - [java.util.concurrent.FutureTask@35851384] .lang .InterruptedException : sleep interrupted
处理异常
try..catch捕获异常
使用future
没有异常的时候返回return的结果,有异常则返回异常信息
1 2 3 4 5 6 7 8 9 10 public static void main (String[] args) throws InterruptedException, ExecutionException {ScheduledExecutorService pool = Executors.newScheduledThreadPool(2 );"task1" );int i = 1 / 0 ;return true ;"{}" , f.get());
tomcat线程池
tomcat中用到的线程池
LimitLatch 用来限流,可以控制最大连接个数,类似 J.U.C 中的 Semaphore
Acceptor 只负责【接收新的 socket 连接】
Poller 只负责监听 socket channel 是否有【可读的 I/O 事件】
一旦可读,封装一个任务对象(socketProcessor),提交给 Executor 线程池处理
Executor 线程池中的工作线程最终负责【处理请求】
ForkJoinPool Fork/Join 是 JDK 1.7 加入的新的线程池实现,它体现的是一种分治思想 ,适用于能够进行任务拆分的 cpu 密集型 运算
就是用多线程来计算各部分的值,最后合并
案例
计算1~n的和
拆分的不好,一个线程等待另一个线程的结果,总体上像串行执行
1 2 3 4 5 6 7 8 9 10 11 12 13 14 15 16 17 18 19 20 21 22 23 24 25 26 27 28 29 30 31 32 33 34 35 36 37 38 39 40 public class Test23 {public static void main (String[] args) {ForkJoinPool pool = new ForkJoinPool (4 );new MyTask (5 )));@Slf4j(topic = "c.MyTask") class MyTask extends RecursiveTask <Integer> {private int n;public MyTask (int n) {this .n = n;@Override protected Integer compute () {if (n == 1 ) {"join() {}" , n);return 1 ;MyTask t1 = new MyTask (n - 1 );"fork() {} + {}" , n, t1);int result = n + t1.join(); "join() {} + {} = {}" , n, t1, result);return result;@Override public String toString () {return "{" + n + "}" ;
改进
拆分成两部分计算
1 2 3 4 5 6 7 8 9 10 11 12 13 14 15 16 17 18 19 20 21 22 23 24 25 26 27 28 29 30 31 32 33 34 35 36 37 38 39 public class Test23 {public static void main (String[] args) {ForkJoinPool pool = new ForkJoinPool (4 );new MyTask2 (1 , 5 )));@Slf4j(topic = "c.MyTask") class MyTask2 extends RecursiveTask <Integer> {private int begin;private int end;public MyTask2 (int begin, int end) {this .begin = begin;this .end = end;@Override protected Integer compute () {if (begin == end) {return begin;if (end - begin == 1 ) {return end - begin;int mid = begin + (end - begin) / 2 ;MyTask2 t1 = new MyTask2 (begin, mid);MyTask2 t2 = new MyTask2 (mid + 1 , end);return t1.join() + t2.join();
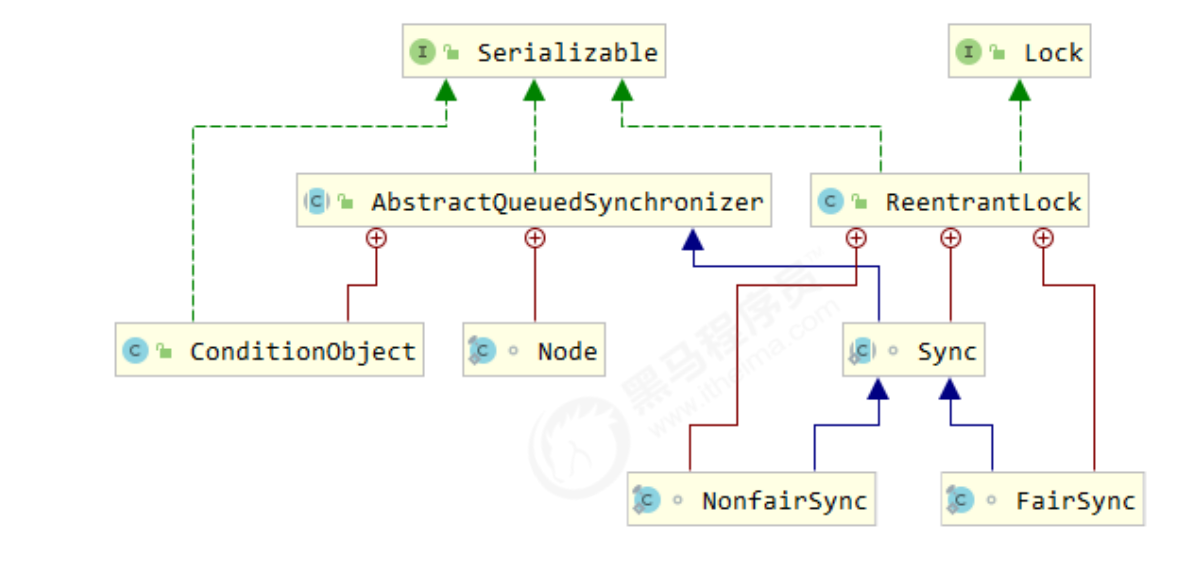
:star:JUC工具包 AQS原理 全称AbstractQueuedSynchronizer,是阻塞式锁和相关的同步器工具的框架
有以下特点:
用 state 属性来表示资源的状态(独占、共享)
提供了基于 FIFO 的等待队列
支持多个条件变量(不同条件的等待队列)
自定义一个锁
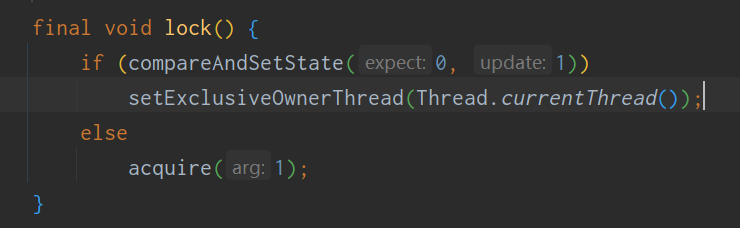
1 2 3 4 5 6 7 8 9 10 11 12 13 14 15 16 17 18 19 20 21 22 23 24 25 26 27 28 29 30 31 32 33 34 35 36 37 38 39 40 41 42 43 44 45 46 47 48 49 50 51 52 53 54 55 56 57 58 59 60 61 62 63 64 65 66 67 68 69 70 71 72 73 74 75 76 77 78 79 80 81 82 83 84 85 86 87 88 89 90 91 92 93 94 95 96 97 98 99 100 101 102 103 104 105 106 107 @Slf4j(topic = "c.Test24") public class Test24 {public static void main (String[] args) {MyLock lock = new MyLock ();new Thread (() -> {try {"locking..." );1000 );catch (InterruptedException e) {finally {"unlocking..." );"t1" ).start();new Thread (() -> {try {"locking..." );1000 );catch (InterruptedException e) {finally {"unlocking..." );"t2" ).start();final class MySync extends AbstractQueuedSynchronizer {@Override protected boolean tryAcquire (int acquires) {if (acquires == 1 ) {if (compareAndSetState(0 , 1 )) {return true ;return false ;@Override protected boolean tryRelease (int acquires) {if (acquires == 1 ) {if (getState() == 0 ) {throw new IllegalMonitorStateException ();null );0 );return true ;return false ;protected Condition newCondition () {return new ConditionObject ();@Override protected boolean isHeldExclusively () {return getState() == 1 ;class MyLock implements Lock {static MySync sync = new MySync ();@Override public void lock () {1 );@Override public void lockInterruptibly () throws InterruptedException {1 );@Override public boolean tryLock () {return sync.tryAcquire(1 );@Override public boolean tryLock (long time, TimeUnit unit) throws InterruptedException {return sync.tryAcquireNanos(1 , unit.toNanos(time));@Override public void unlock () {1 );@Override public Condition newCondition () {return sync.newCondition();
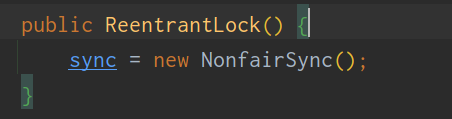
ReentrantLock原理
非公平锁原理
ReentrantLock默认是非公平锁
调用了非公平锁的上锁方法lock()
lock方法
如果成功上锁,则把锁的状态改为1,锁的拥有者改为当前线程
如果上锁失败,进入acquire()方法,会再尝试上锁几次,都失败后进入等待队列(双向链表),线程设置为等待状态
释放锁,调用了unlock()方法,将唤醒等待队列上最近的线程,和没有在等待队列中的线程竞争锁(非公平)
可重入原理
如果第一次上锁,则把计数用的c置为1,以后拥有锁的线程每次来上锁c都会加1
释放锁时,c减1,如果此时c不等于0,则不会释放锁,直到等于0时才会执行释放锁的操作
打断原理
不可打断:线程在等待的时候被打断了,会将打断标记置为true,然后继续去等待锁,而不是立刻被打断。只有当获取到锁后,才会判断是否有被打断,如果有则会执行打断操作
可打断:和不可打断不一样的地方是,如果在等待的时候被打断了,则会抛出异常,不继续到等待队列中等待
公平锁原理
不公平锁是判断锁没有拥有者时直接去申请锁,公平锁是先判断在等待队列中,有没有前驱,如果没有前驱,代表没有比当前线程更早申请锁的线程,这时才去申请锁。
条件变量原理
每个条件变量其实就对应着一个等待队列,其实现类是 ConditionObject
进入条件阻塞队列:调用await()将会把当前线程加入到条件变量的阻塞队列,然后fullyRelease()释放自己持有的锁,调用park()把自己阻塞住
唤醒:调用signal()获取阻塞队列的第一个线程并尝试唤醒,如果成功则把它加入到等待锁的队列尾,如果失败(如等待超时,被打断而不继续等锁)则获取条件阻塞队列的下一个线程
读写锁 ReentrantReadWriteLock
案例
定义一个存放数据的容器,有读写功能
1 2 3 4 5 6 7 8 9 10 11 12 13 14 15 16 17 18 19 20 21 22 23 24 25 26 27 28 29 30 31 32 33 34 35 36 37 38 @Slf4j(topic = "c.DataContainer") class DataContainer {private Object data;private ReentrantReadWriteLock rw = new ReentrantReadWriteLock ();private ReentrantReadWriteLock.ReadLock r = rw.readLock();private ReentrantReadWriteLock.WriteLock w = rw.writeLock();public Object read () {"获取读锁" );try {"读操作" );1000 );return data;catch (InterruptedException e) {finally {"释放读锁" );return null ;public void write () {"获取写锁" );try {"写操作" );finally {"释放写锁" );
测试读-写
1 2 3 4 5 6 7 8 9 10 11 12 13 public static void main (String[] args) throws InterruptedException {DataContainer dataContainer = new DataContainer ();new Thread (() -> {"t1" ).start();100 );new Thread (() -> {"t2" ).start();
1 2 3 4 5 6 7 15 :20 :29 [t1] c.DataContainer - 获取读锁15 :20 :29 [t1] c.DataContainer - 读操作15 :20 :29 [t2] c.DataContainer - 获取写锁15 :20 :30 [t1] c.DataContainer - 释放读锁15 :20 :30 [t2] c.DataContainer - 写操作15 :20 :30 [t2] c.DataContainer - 释放写锁
测试读-读
1 2 3 4 5 6 7 8 9 10 11 public static void main (String[] args) throws InterruptedException {DataContainer dataContainer = new DataContainer ();new Thread (() -> {"t1" ).start();new Thread (() -> {"t2" ).start();
1 2 3 4 5 6 7 15 :26 :15 [t2] c.DataContainer - 获取读锁15 :26 :15 [t1] c.DataContainer - 获取读锁15 :26 :15 [t2] c.DataContainer - 读操作15 :26 :15 [t1] c.DataContainer - 读操作15 :26 :16 [t1] c.DataContainer - 释放读锁15 :26 :16 [t2] c.DataContainer - 释放读锁
注意事项:
读锁不支持条件变量
有写锁的时候可以直接获取读锁;而有读锁的时候不能直接获取写锁,需要先释放读锁
原理 读写锁用的是同一个 Sycn 同步器 ,因此等待队列、state 等也是同一个
写锁状态占了 state 的低 16 位,而读锁 使用的是 state 的高 16 位
上写锁
线程调用writeLock().lock()方法,首先判断锁的状态:
如果没有被上锁(读/写),则可以上锁;
如果锁的状态为被上锁,则判断是否是自己上的锁:
上读锁
线程调用readLock().lock()方法,首先判断锁的状态:
如果没有被上锁(写),则可以上锁;
如果锁的状态为被上锁,则判断:
如果被上的是写锁,判断是否是自己上的写锁
如果不是,则进入等待队列(节点状态为共享,代表要加的是读锁)
如果是,则锁降级
如果被上的是读锁,则上锁的个数加1
解写锁
状态位减1,判断状态位是否为0,是0的话就解锁,将锁的拥有者置为null,并通知等待队列的下一个节点
如果下一个节点状态为共享,则通知后面一串的共享节点
如果下一个节点状态为独占,则不继续通知
解读锁
上锁数减1,判断上锁数是否等于0,如果为0,则解读锁,通知等待队列的下一个节点
StampedLock 乐观的读写锁,基于”戳”来判断是否被修改过,如果被修改过,则升级成读锁
适用于读多,写少的场景
实例 创建一个使用乐观锁的数据容器
1 2 3 4 5 6 7 8 9 10 11 12 13 14 15 16 17 18 19 20 21 22 23 24 25 26 27 28 29 30 31 32 33 34 35 36 37 38 39 40 41 42 43 44 45 46 47 48 49 50 51 52 53 54 55 56 @Slf4j(topic = "c.DataContainerStamped") class DataContainerStamped {private int data;private final StampedLock lock = new StampedLock ();public DataContainerStamped (int data) {this .data = data;public int read (int readTime) {long stamp = lock.tryOptimisticRead();"optimistic read locking...{}" , stamp);try {catch (InterruptedException e) {if (lock.validate(stamp)) {"read finish...{}" , stamp);return data;"updating to read lock...{}" , stamp);try {"read lock {}" , stamp);"read finish...{}" , stamp);return data;catch (InterruptedException e) {finally {"read unlock {}" , stamp);return -1 ;public void write (int newData) {long stamp = lock.writeLock();"write lock {}" , stamp);try {2000 );this .data = newData;catch (InterruptedException e) {finally {"write unlock {}" , stamp);
测试:读-读
1 2 3 4 5 6 7 8 9 10 11 12 public static void main (String[] args) throws InterruptedException {DataContainerStamped dataContainer = new DataContainerStamped (1 );new Thread (() -> {1000 );"t1" ).start();500 );new Thread (() -> {0 );"t2" ).start();
1 2 3 4 5 10 :15 :20 [t1] c.DataContainerStamped - optimistic read locking...256 10 :15 :21 [t2] c.DataContainerStamped - optimistic read locking...256 10 :15 :21 [t2] c.DataContainerStamped - read finish...256 10 :15 :21 [t1] c.DataContainerStamped - read finish...256
测试:读-写
1 2 3 4 5 6 7 8 9 10 11 12 public static void main (String[] args) throws InterruptedException {DataContainerStamped dataContainer = new DataContainerStamped (1 );new Thread (() -> {1000 );"t1" ).start();500 );new Thread (() -> {2 );"t2" ).start();
1 2 3 4 5 6 7 8 10 :18 :54 [t1] c.DataContainerStamped - optimistic read locking...256 10 :18 :55 [t2] c.DataContainerStamped - write lock 384 10 :18 :55 [t1] c.DataContainerStamped - updating to read lock...256 10 :18 :57 [t2] c.DataContainerStamped - write unlock 384 10 :18 :57 [t1] c.DataContainerStamped - read lock 513 10 :18 :58 [t1] c.DataContainerStamped - read finish...513 10 :18 :58 [t1] c.DataContainerStamped - read unlock 513
注意
StampedLock 不支持条件变量
StampedLock 不支持可重入
Semaphore 信号量,用来限制同时访问共享资源的线程数量(不是限制资源数量)
实例 最多同时有3个线程在运行
1 2 3 4 5 6 7 8 9 10 11 12 13 14 15 16 17 18 19 20 public static void main (String[] args) {Semaphore semaphore = new Semaphore (3 );for (int i = 0 ; i < 10 ; i++) {new Thread (() -> {try {"running..." );1000 );"end..." );catch (InterruptedException e) {finally {
应用 可以用在限制线程池连接数上
原理 初始化
将传入的信号量数赋值给同步器(NonfairSync)的state
获取信号量
调用acqire()方法,将会用cas尝试将State减1,如果还有剩余的信号量则获取成功,否则进入等待队列
释放信号量
调用release()方法,尝试将State加1并唤醒等待队列的下一个节点
CountdownLatch 用来进行线程同步协作,等待所有线程完成
完成的线程将计数值减1,当计数值减为0时,等待的线程才能运行
CountdownLatch是一次性的,latch不能增加
方法
作用
await()
等待latch降为0
await(long, timeout, TimeUnit unit)
有超时时间的等待
getCount()
获取latch的值
countDown()
latch - 1
实例1 1 2 3 4 5 6 7 8 9 10 11 12 13 14 15 16 17 18 19 20 21 22 23 24 25 26 27 28 29 30 31 32 33 34 35 36 37 38 39 public static void main (String[] args) throws InterruptedException {CountDownLatch latch = new CountDownLatch (3 );new Thread (() -> {"begin" );try {1000 );catch (InterruptedException e) {"end" );new Thread (() -> {"begin" );try {1000 );catch (InterruptedException e) {"end" );new Thread (() -> {"begin" );try {1000 );catch (InterruptedException e) {"end" );"main begin" );
1 2 3 4 5 6 7 8 // 控制台16 :20 :51 [Thread-0 ] c .Test28 - begin 16 :20 :51 [Thread-2 ] c .Test28 - begin 16 :20 :51 [Thread-1 ] c .Test28 - begin 16 :20 :52 [Thread-0 ] c .Test28 - end 16 :20 :52 [Thread-2 ] c .Test28 - end 16 :20 :52 [Thread-1 ] c .Test28 - end 16 :20 :52 [main] c .Test28 - main begin
与join相比,CountdownLatch可以配合线程池使用
实例2 模拟加载进度条
1 2 3 4 5 6 7 8 9 10 11 12 13 14 15 16 17 18 19 20 21 22 23 24 25 26 27 28 29 30 31 32 33 34 35 public static void main (String[] args) {CountDownLatch latch = new CountDownLatch (10 );ExecutorService pool = Executors.newFixedThreadPool(10 );Random random = new Random ();new String [10 ];for (int i = 0 ; i < 10 ; i++) {int k = i;for (int j = 0 ; j <= 100 ; j++) {try {100 ));catch (InterruptedException e) {"%" ;"\r" + Arrays.toString(all));try {"\n加载完成" );catch (InterruptedException e) {
1 2 3 100 % , 100 % , 100 % , 100 % , 100 % , 100 % , 100 % , 100 % , 100 % , 100 % ]
CyclicBarrier 循环栅栏,与CountdownLatch相似,不同在于CountdownLatch减完就没了,而cyclicBarrier可以重用
方法
作用
await()
当前线程等待,count - 1,只有count为0时所有等待的线程才继续运行
实例 当await的线程数到达2时,才会继续运行
1 2 3 4 5 6 7 8 9 10 11 12 13 14 15 16 17 18 19 20 21 22 23 24 25 26 27 28 29 30 31 32 public static void main (String[] args) throws InterruptedException {ExecutorService pool = Executors.newFixedThreadPool(2 );CyclicBarrier barrier = new CyclicBarrier (2 , () -> {"task1 task2 finish" );for (int i = 0 ; i < 3 ; i++) {"task1 begin..." );try {1000 );catch (InterruptedException | BrokenBarrierException e) {"task1 begin..." );try {2000 );catch (InterruptedException | BrokenBarrierException e) {
1 2 3 4 5 6 7 8 9 10 15 :26 :14 [pool-1-thread-1] c.Test29 - task1 begin...15 :26 :14 [pool-1-thread-2] c.Test29 - task1 begin...15 :26 :16 [pool-1-thread-2] c.Test29 - task1 task2 finish15 :26 :16 [pool-1-thread-2] c.Test29 - task1 begin...15 :26 :16 [pool-1-thread-1] c.Test29 - task1 begin...15 :26 :18 [pool-1-thread-1] c.Test29 - task1 task2 finish15 :26 :18 [pool-1-thread-1] c.Test29 - task1 begin...15 :26 :18 [pool-1-thread-2] c.Test29 - task1 begin...15 :26 :20 [pool-1-thread-2] c.Test29 - task1 task2 finish
线程安全集合类 ConcurrentHashMap 保证了每个方法的原子性
1 2 3 4 5 6 7 8 9 10 11 12 13 14 15 16 17 18 19 20 21 22 23 24 25 26 27 28 29 30 31 32 33 34 35 36 37 38 39 40 41 42 43 44 45 46 47 48 49 50 51 52 53 54 55 56 57 58 59 60 61 62 63 64 65 66 67 68 69 70 71 72 73 74 75 76 77 78 79 80 81 82 83 84 85 86 87 88 static final String ALPHA = "abcedfghijklmnopqrstuvwxyz" ;public static void main (String[] args) {new ConcurrentHashMap <String, LongAdder>(),for (String word : words) {LongAdder value = map.computeIfAbsent(word, (key) -> new LongAdder ());private void demo1 () {int length = ALPHA.length();int count = 200 ;new ArrayList <>(length * count);for (int i = 0 ; i < length; i++) {char ch = ALPHA.charAt(i);for (int j = 0 ; j < count; j++) {for (int i = 0 ; i < 26 ; i++) {try (PrintWriter out = new PrintWriter (new OutputStreamWriter (new FileOutputStream ("tmp/" + (i + 1 ) + ".txt" )))) {String collect = list.subList(i * count, (i + 1 ) * count).stream()"\n" ));catch (IOException e) {private static <V> void demo (Supplier<Map<String, V>> supplier, BiConsumer<Map<String, V>, List<String>> consumer) {new ArrayList <>();for (int i = 1 ; i <= 26 ; i++) {int idx = i;Thread thread = new Thread (() -> {try {catch (InterruptedException e) {public static List<String> readFromFile (int i) {new ArrayList <>();try (BufferedReader in = new BufferedReader (new InputStreamReader (new FileInputStream ("tmp/" ".txt" )))) {while (true ) {String word = in.readLine();if (word == null ) {break ;return words;catch (IOException e) {throw new RuntimeException (e);
1 2 // 控制台a=200, b=200, c=200, d=200, e=200, f=200, g=200, h=200, i=200, j=200, k=200, l=200, m=200, n=200, o=200, p=200, q=200, r=200, s=200, t=200, u=200, v=200, w=200, x=200, y=200, z=200}
原理 死链
哈希表中的链表出现了死循环,出现在jdk7
当哈希表中的元素数量达到容量的3/4时,会扩容哈希表
jdk7是采用头插法建立链表,多线程时,当一个线程扩容完,另一个线程也去扩容
会导致链表中产生循环链表,从而直接卡死
JDK 8 虽然将扩容算法做了调整,不再将元素加入链表头(而是保持与扩容前一样的顺序),但仍不意味着能 够在多线程环境下能够安全扩容,还会出现其它问题(如扩容丢数据)
构造函数
参数:初始容量、负载因子、并发度
初始容量要 >= 并发度,如果初始容量设置的小于并发度,则会被改成=并发度
容量得是2^n,因此传过来的容量不一定就是map的实际容量
实现了懒惰初始化 (jdk8),在构造方法中仅仅计算了 table 的大小 ,以后在第一次使用时才会真正创建
1 2 3 4 5 6 7 8 9 10 11 public ConcurrentHashMap (int initialCapacity, float loadFactor, int concurrencyLevel) {if (!(loadFactor > 0.0f ) || initialCapacity < 0 || concurrencyLevel <= 0 )throw new IllegalArgumentException ();if (initialCapacity < concurrencyLevel) long size = (long )(1.0 + (long )initialCapacity / loadFactor);int cap = (size >= (long )MAXIMUM_CAPACITY) ?int )size);this .sizeCtl = cap;
get函数
1 2 3 4 5 6 7 8 9 10 11 12 13 14 15 16 17 18 19 20 21 22 23 24 public V get (Object key) {int n, eh; K ek;int h = spread(key.hashCode());if ((tab = table) != null && (n = tab.length) > 0 &&1 ) & h)) != null ) {if ((eh = e.hash) == h) {if ((ek = e.key) == key || (ek != null && key.equals(ek)))return e.val;else if (eh < 0 )return (p = e.find(h, key)) != null ? p.val : null ;while ((e = e.next) != null ) {if (e.hash == h &&null && key.equals(ek))))return e.val;return null ;
put函数
key如果已存在,默认覆盖旧值
通过cas来创建节点、添加到头结点,不使用synchronized来提高效率
如果发现头结点值为-1,则说明哈希表正在扩容,则会先去帮忙扩容
在要插入值的时候,会锁住当前的链表/红黑树
initTable函数
真正创建hash表
1 2 3 4 5 6 7 8 9 10 11 12 13 14 15 16 17 18 19 20 21 22 23 private final Node<K,V>[] initTable() {int sc;while ((tab = table) == null || tab.length == 0 ) {if ((sc = sizeCtl) < 0 )else if (U.compareAndSwapInt(this , SIZECTL, sc, -1 )) {try {if ((tab = table) == null || tab.length == 0 ) {int n = (sc > 0 ) ? sc : DEFAULT_CAPACITY;new Node <?,?>[n];2 );finally {break ;return tab;
size计算流程
size 计算实际发生在 put,remove 改变集合元素的操作之中
没有竞争发生,向 baseCount 累加计数
有竞争发生,新建 counterCells,向其中的一个 cell 累加计数
counterCells 初始有两个
cell 如果计数竞争比较激烈,会创建新的 cell 来累加计数
1 2 3 4 5 6 7 8 9 10 11 12 13 14 15 16 17 18 19 20 public int size () {long n = sumCount();return ((n < 0L ) ? 0 :long )Integer.MAX_VALUE) ? Integer.MAX_VALUE :int )n);final long sumCount () {long sum = baseCount;if (as != null ) {for (int i = 0 ; i < as.length; ++i) {if ((a = as[i]) != null )return sum;
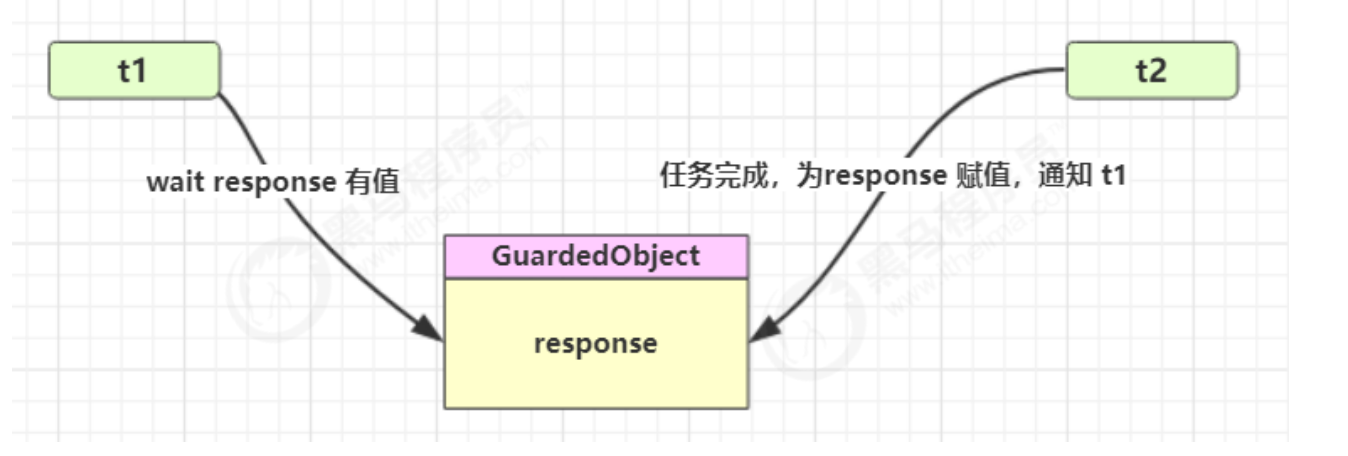
并发编程模式 保护性暂停
用一个线程等待另一个线程的执行结果
保护性暂停是同步的
案例
1 2 3 4 5 6 7 8 9 10 11 12 13 14 15 16 17 18 19 20 21 22 23 24 25 26 27 28 29 30 31 32 33 34 35 36 37 38 39 40 41 42 43 44 45 46 47 48 49 50 51 52 53 54 55 56 57 58 59 60 61 62 63 64 65 66 67 68 69 70 71 @Slf4j(topic = "c.text4") public class Test4 {public static void main (String[] args) {GuardedObject guardedObject = new GuardedObject ();new Thread (() -> {"等待结果" );String str = (String)guardedObject.get();"结果" + str);"t1" ).start();new Thread (() -> {try {3000 );"产生结果" );"aaaaa" );catch (InterruptedException e) {"t2" ).start();class GuardedObject {private Object response;public Object get () {synchronized (this ) {try {while (response == null )this .wait();catch (InterruptedException e) {return response;public Object get (long timeout) {synchronized (this ) {long begin = System.currentTimeMillis();long passedTime = 0 ;try {while (response == null ) {long waitTime = timeout - passedTime;if (waitTime <= 0 ) {break ;this .wait(waitTime);catch (InterruptedException e) {return response;public void complete (Object response) {synchronized (this ) {this .response = response;this .notifyAll();
保护性暂停例子
邮递员送信,居民收信
1 2 3 4 5 6 7 8 9 10 11 12 13 14 15 16 17 18 19 20 21 22 23 24 25 26 27 28 29 30 31 32 33 34 35 36 37 38 39 40 41 42 43 44 45 46 47 48 49 50 51 52 53 54 55 56 57 58 59 60 61 62 63 64 65 66 67 68 69 70 71 72 73 74 75 76 77 78 79 80 81 82 83 84 85 86 87 88 89 90 91 92 93 94 95 96 97 98 99 100 101 102 103 104 105 106 107 108 109 110 111 112 113 114 115 116 117 118 119 120 121 122 123 124 125 126 127 128 129 130 @Slf4j(topic = "c.text4") public class Test4 {public static void main (String[] args) throws InterruptedException {for (int i = 0 ; i < 3 ; i++) {People people = new People ();500 );for (Integer id : Mailboxes.getIds()) {new Postman (id, "内容" + id).start();@Slf4j(topic = "c.People") class People extends Thread {@Override public void run () {GuardedObject guardedObject = Mailboxes.createGuardedObject();"开始收信:{}" , guardedObject.getId());Object mail = guardedObject.get(5000 );"{}收到信:{}" , guardedObject.getId(), mail);@Slf4j(topic = "c.Postman") class Postman extends Thread {private int id;private String mail;@Override public void run () {GuardedObject go = Mailboxes.getGuardedObject(this .id);public Postman (int id, String mail) {this .id = id;this .mail = mail;class Mailboxes {private static Map<Integer, GuardedObject> boxes = new Hashtable <>();private static int id = 1 ;private static synchronized int generateId () {return id++;public static synchronized GuardedObject createGuardedObject () {GuardedObject go = new GuardedObject (generateId());return go;public static Set<Integer> getIds () {return boxes.keySet();public static GuardedObject getGuardedObject (int id) {return boxes.remove(id);class GuardedObject {private int id;private Object response;public GuardedObject () {public GuardedObject (int id) {this .id = id;public int getId () {return id;public Object get () {synchronized (this ) {try {while (response == null )this .wait();catch (InterruptedException e) {return response;public Object get (long timeout) {synchronized (this ) {long begin = System.currentTimeMillis();long passedTime = 0 ;try {while (response == null ) {long waitTime = timeout - passedTime;if (waitTime <= 0 ) {break ;this .wait(waitTime);catch (InterruptedException e) {return response;public void complete (Object response) {synchronized (this ) {this .response = response;this .notifyAll();
生产者/消费者
通过消息队列实现
是异步的
案例
1 2 3 4 5 6 7 8 9 10 11 12 13 14 15 16 17 18 19 20 21 22 23 24 25 26 27 28 29 30 31 32 33 34 35 36 37 38 39 40 41 42 43 44 45 46 47 48 49 50 51 52 53 54 55 56 57 58 59 60 61 62 63 64 65 66 67 68 class MessageQueue {private LinkedList<Message> list;private int capcity;public MessageQueue (int capcity) {new LinkedList <>();this .capcity = capcity;public Message take () {synchronized (this ) {while (list.isEmpty()) {try {"队列为空" );this .wait();catch (InterruptedException e) {Message msg = list.removeFirst();this .notifyAll(); "已消费" + msg);return msg;public void put (Message msg) {synchronized (this ) {while (list.size() == capcity) {try {"队列已满" );this .wait();catch (InterruptedException e) {"已生产" + msg);this .notifyAll(); final class Message {private int id;private Object value;public Message (int id, Object value) {this .id = id;this .value = value;public int getId () {return id;public Object getValue () {return value;
顺序控制
必须按照顺序执行代码
同步的
案例
顺序交替打印
1 2 3 4 5 6 7 8 9 10 11 12 13 14 15 16 17 18 19 20 21 22 23 24 25 26 27 28 29 30 31 32 33 34 35 36 37 38 39 40 41 42 43 44 45 46 47 48 49 50 51 52 53 54 55 56 57 58 59 60 public class Test8 {private static ReentrantLock lock = new ReentrantLock ();private static int flag = 1 ;public static void main (String[] args) throws InterruptedException {AwaitSignal as = new AwaitSignal (5 );Condition aWaitSet = as.newCondition();Condition bWaitSet = as.newCondition();Condition cWaitSet = as.newCondition();new Thread (() -> {"a" , aWaitSet, bWaitSet);new Thread (() -> {"b" , bWaitSet, cWaitSet);new Thread (() -> {"c" , cWaitSet, aWaitSet);1000 );@Slf4j(topic = "c.AwaitSignal") class AwaitSignal extends ReentrantLock {private int loopNum;public AwaitSignal (int loopNum) {this .loopNum = loopNum;public void start (Condition first) {this .lock();try {"start" );finally {this .unlock();public void print (String str, Condition current, Condition next) {for (int i = 0 ; i < loopNum; i++) {this .lock();try {catch (InterruptedException e) {finally {this .unlock();
犹豫模式
在一个线程发现另一个线程或本线程已经做了某一件相同的事,那么本线程就无需再做 了,直接结束返回
实例1(只启动一个监控线程)
1 2 3 4 5 6 7 8 9 10 11 12 13 14 15 public class MonitorService {private volatile boolean starting;public void start () {"尝试启动监控线程..." );synchronized (this ) {if (starting) {return ;true ;
实例2(单例模式)
1 2 3 4 5 6 7 8 9 10 11 12 public final class Singleton {private Singleton () {private static Singleton INSTANCE = null ;public static synchronized Singleton getInstance () {if (INSTANCE != null ) {return INSTANCE;new Singleton ();return INSTANCE;
享元模式 java中,包装类Boolean,Byte,Short,Integer,Long,Character等使用到了享元模式。调用valueOf方法时,如果值在其缓存的数组内,则直接从缓存中读取
Long的valueOf方法实现
1 2 3 4 5 6 7 public static Long valueOf (long l) {final int offset = 128 ;if (l >= -128 && l <= 127 ) { return LongCache.cache[(int )l + offset];return new Long (l);
各个包装类的缓存范围
Byte, Short, Long 缓存的范围都是 -128~127
Character 缓存的范围是 0~127
Integer的默认范围是 -128~127
最小值不能变
但最大值可以通过调整虚拟机参数 -Djava.lang.Integer.IntegerCache.high 来改变
Boolean 缓存了 TRUE 和 FALSE
线程池小demo
1 2 3 4 5 6 7 8 9 10 11 12 13 14 15 16 17 18 19 20 21 22 23 24 25 26 27 28 29 30 31 32 33 34 35 36 37 38 39 40 41 42 43 44 45 46 47 48 49 50 51 52 53 54 55 56 57 58 59 60 61 62 63 64 65 66 67 68 69 70 71 72 73 74 75 76 public class Test20 {public static void main (String[] args) {Pool pool = new Pool (2 );for (int i = 0 ; i < 5 ; i++) {new Thread (() -> {Connection conn = pool.borrow();try {new Random ().nextInt(1000 ));catch (InterruptedException e) {@Slf4j(topic = "c.Pool") class Pool {private final int poolSize;private Connection[] connections;private AtomicIntegerArray states;public Pool (int poolSize) {this .poolSize = poolSize;this .connections = new Connection [poolSize];this .states = new AtomicIntegerArray (new int [poolSize]);for (int i = 0 ; i < poolSize; i++) {new MockConnection ("连接" + i);public Connection borrow () {while (true ) {for (int i = 0 ; i < poolSize; i++) {if (states.get(i) == 0 ) {0 , 1 );"获取连接{}" , connections[i].toString());return connections[i];synchronized (this ) {try {"等待获取连接" );this .wait();catch (InterruptedException e) {public void free (Connection connection) {for (int i = 0 ; i < poolSize; i++) {if (connections[i] == connection) {0 );synchronized (this ) {"归还连接{}" , connections[i].toString());this .notifyAll();break ;
分工模式 让有限的工作线程(Worker Thread)来轮流异步处理无限多的任务,它的典型实现 就是线程池,也体现了经典设计模式中的享元模式。
饥饿问题
如果一个线程池的线程什么都做,有可能会产生饥饿。
如一个线程调用线程池中的其他线程来完成任务,如果所有线程都处于调用其他线程的状态,而没有执行任务的线程,就会发生饥饿
解决饥饿方式
不同的任务类型,采用不同的线程池
创建多少线程池合适
线程不是越多越好,太多线程会占用大量内存,线程的上下文切换也会消耗资源
任务分为运算密集型和I/O密集型,当运算密集型任务多的时候,应线程数较少;而I/O密集型任务多时,应多创建线程
经验公式:线程数 = 核数 * 期望 CPU 利用率 * 总时间(CPU计算时间+等待时间) / CPU 计算时间