多级缓存
多级缓存
概念
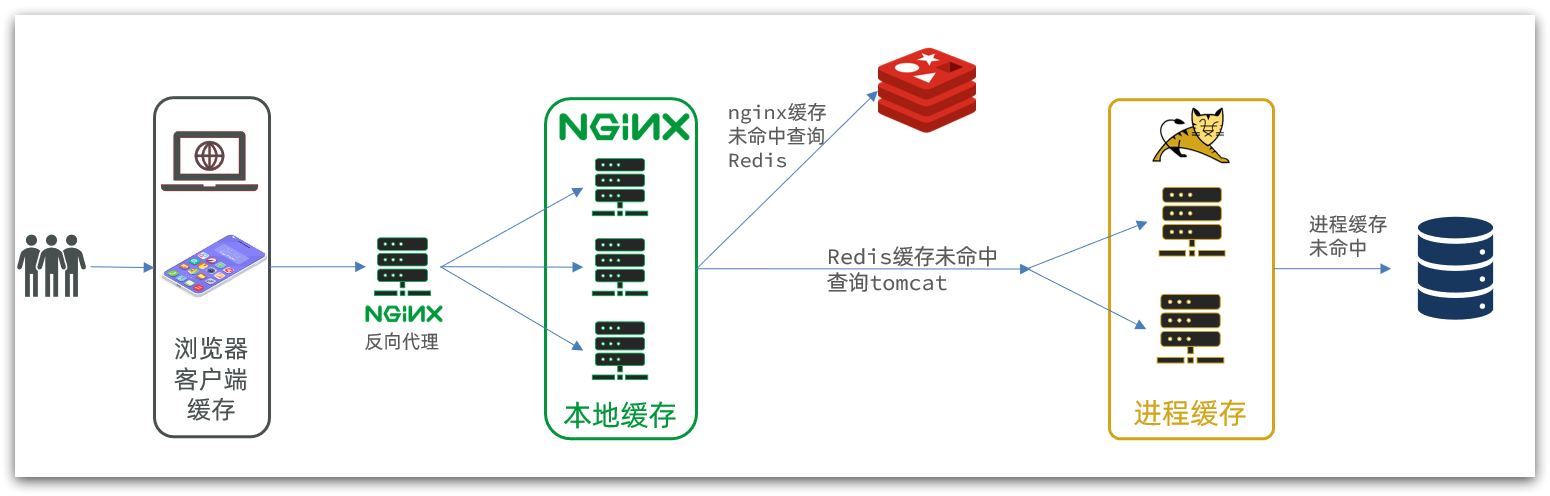
tomcat查询的速度比较慢,尽量通过缓存来减少tomcat的查询
多级缓存就是充分利用请求处理的每个环节,分别添加缓存,减轻Tomcat压力,提升服务性能
多级缓存的关键有两个:
一个是在nginx中编写业务,实现nginx本地缓存、Redis、Tomcat的查询
另一个就是在Tomcat中实现JVM进程缓存
JVM进程缓存
Caffeine
Caffeine是一个基于Java8开发的,提供了近乎最佳命中率的高性能的本地缓存库。目前Spring内部的缓存使用的就是Caffeine
使用Caffeine
导入坐标
1
2
3
4<dependency>
<groupId>com.github.ben-manes.caffeine</groupId>
<artifactId>caffeine</artifactId>
</dependency>基本使用
1
2
3
4
5
6
7
8
9
10
11
12
13
14
15
16
17
18
19
20
21
22
23
24
@Test
void test1() {
//创建缓存对象
Cache<String, String> cache = Caffeine.newBuilder().build();
//添加数据到缓存
cache.put("name", "zs");
System.out.println(cache.getIfPresent("name"));
//类似getOrDefault,可以在查不到缓存的时候查数据库来返回值
String name = cache.get("defaultName", key -> {
return "ls";
});
System.out.println(name);
}
@Test
void test2() {
Cache<String, String> cache = Caffeine.newBuilder()
//添加清除缓存策略
.maximumSize(1) //基于容量,超过1个缓存就会清除旧的
.expireAfterWrite(Duration.ofSeconds(10)) //基于时间, 10s后清除
.build();
}实例
注入到容器实现自动装配
1
2
3
4
5
6
7
8
9
10
11
12
13
14
15
16
17
18
@Configuration
public class CaffeineConfig {
@Bean
public Cache<Long, Item> itemCache() {
return Caffeine.newBuilder()
.initialCapacity(100)
.maximumSize(10000)
.build();
}
@Bean
public Cache<Long, ItemStock> itemStockCache() {
return Caffeine.newBuilder()
.initialCapacity(100)
.maximumSize(10000)
.build();
}
}通过Cache实现JVM进程缓存
1
2
3
4
5
6
7
8
9
10
11
12
13
14
15
16
17
18
19
20
21
22
23
24
25
26
27
28
29
30
31
32
33
@RestController
@RequestMapping("item")
public class ItemController {
@Autowired
private IItemService itemService;
@Autowired
private IItemStockService stockService;
//商品缓存
@Autowired
private Cache<Long, Item> itemCache;
//库存缓存
@Autowired
private Cache<Long, ItemStock> itemStockCache;
@GetMapping("/{id}")
public Item findById(@PathVariable("id") Long id){
//先查缓存,没有再查数据库
return itemCache.get(id, key -> {
return itemService.query()
.ne("status", 3).eq("id", id)
.one();
});
}
@GetMapping("/stock/{id}")
public ItemStock findStockById(@PathVariable("id") Long id){
return itemStockCache.get(id, key -> {
return stockService.getById(id);
});
}
}
Lua语法入门
Lua 是一种轻量小巧的脚本语言,用标准C语言编写并以源代码形式开放, 其设计目的是为了嵌入应用程序中,从而为应用程序提供灵活的扩展和定制功能。官网
Lua经常嵌入到C语言开发的程序中,例如游戏开发、游戏插件等。
Nginx本身也是C语言开发,因此也允许基于Lua做拓展。
打印
创建hello.lua文件
1
2
3
touch hello.lua
# 编辑
vim hello.lua文件内
1
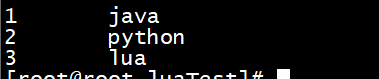
print("hello lua")运行hello.lua
1
lua hello.lua
变量
变量类型
| 数据类型 | 描述 |
|---|---|
| nil | 表示一个无效值或false |
| boolean | true/false |
| number | 双精度浮点数 |
| string | 字符串 |
| function | 函数 |
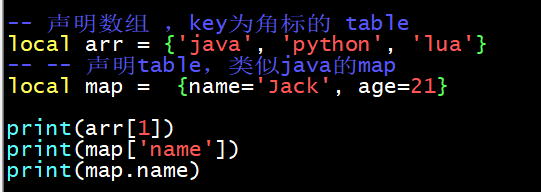
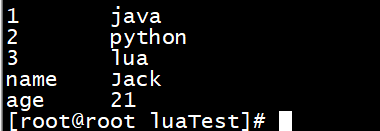
| table | 可以作为数组或map来使用 |
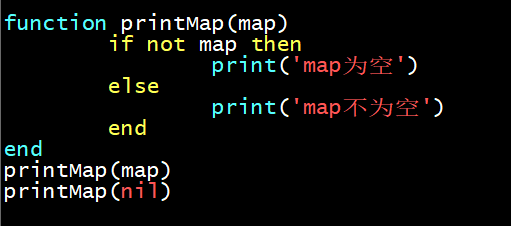
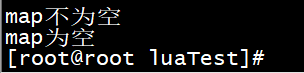
通过函数type()可以查看变量类型

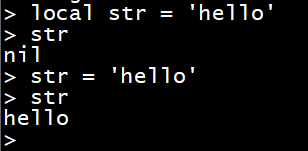
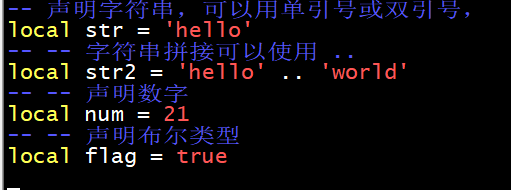
声明变量
Lua声明变量的时候无需指定数据类型
local 关键字声明局部变量,没有则是全局变量
string、number、boolean
table
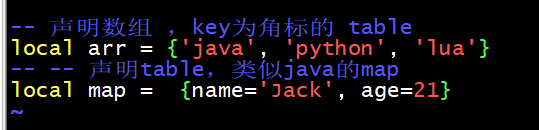
访问table
下标从1开始

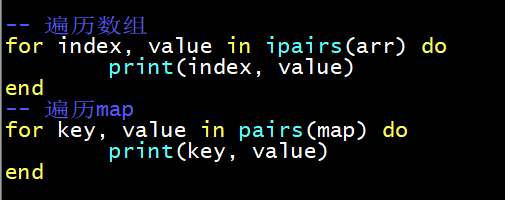
循环
循环数组用ipairs,循环map用pairs
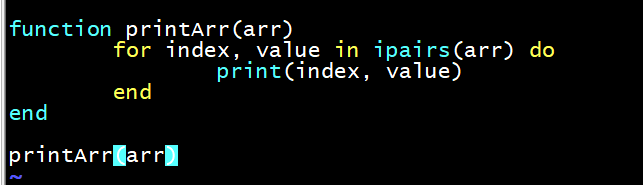
函数
条件判断
语法
1 | |
&& || ! 对应 and or not
OpenResty
基于 Nginx的高性能 Web 平台,用于方便地搭建能够处理超高并发、扩展性极高的动态 Web 应用、Web 服务和动态网关。官网
特点:
- 具备Nginx的完整功能
- 基于Lua语言进行扩展,集成了大量精良的 Lua 库、第三方模块
- 允许使用Lua自定义业务逻辑、自定义库
安装
安装OpenResty依赖开发库
1
yum install -y pcre-devel openssl-devel gcc --skip-broken安装OpenResty仓库,便于未来安装或更新我们的软件包
1
yum-config-manager --add-repo https://openresty.org/package/centos/openresty.repo安装OpenResty
1
yum install -y openresty安装opm工具
opm是OpenResty的一个管理工具,可以帮助我们安装一个第三方的Lua模块
1
yum install -y openresty-opm默认情况下,OpenResty安装的目录是:/usr/local/openresty
OpenResty就是在Nginx基础上集成了一些Lua模块
配置环境变量
1 | |
运行
运行方式与nginx基本一致
1 | |
/usr/local/openresty/nginx/conf/nginx.conf为nginx默认的配置文件,里面注释比较多,可以将nginx.conf中的注释部分删除,保留有效部分。
1 | |
通过OpenResty响应请求
案例
做反向代理的nginx的配置文件
将请求发送到OpenResty端口
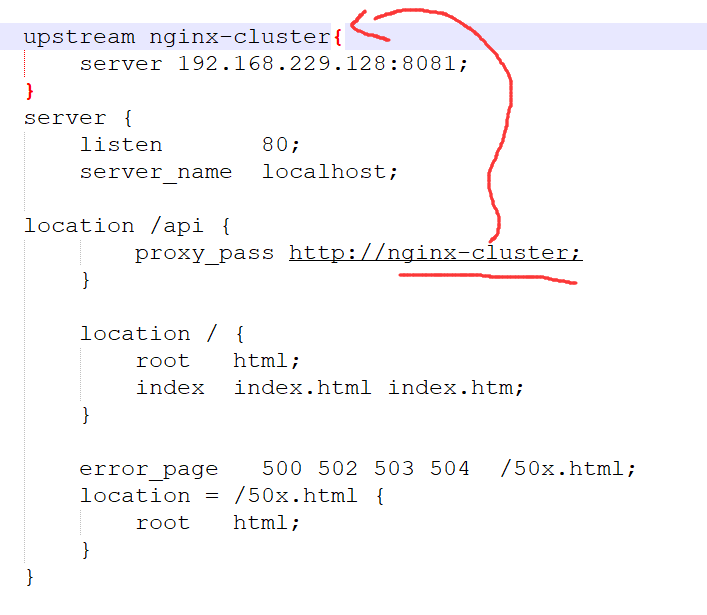
OpenResty配置文件
在http下面添加Lua依赖库
改完配置文件nginx -s reload 重新加载一下配置文件
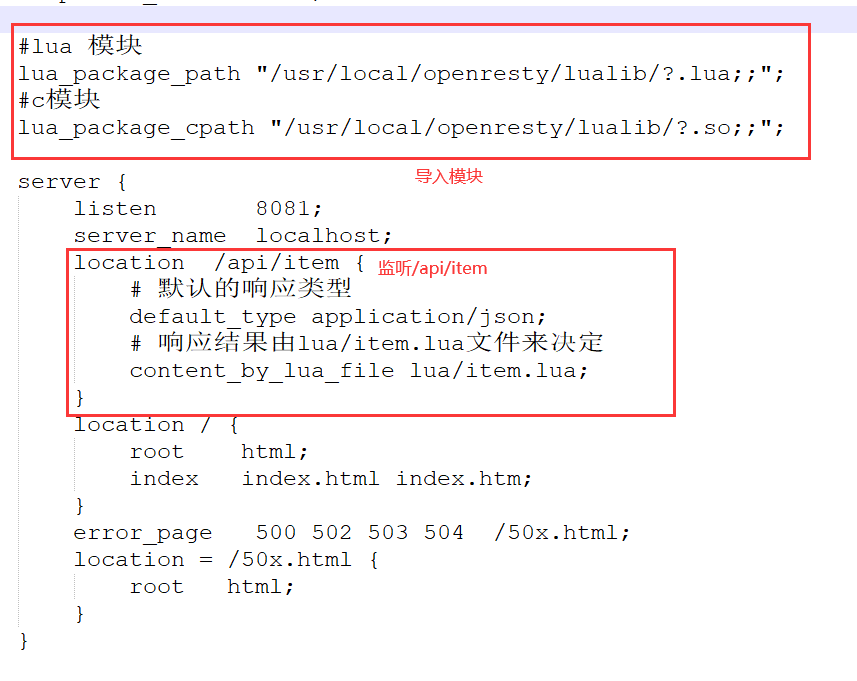
在OpenResty的
/usr/local/openresty/nginx下创建lua/item.lua文件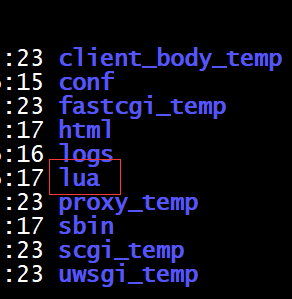
在
lua/item.lua文件里面编写响应的逻辑这里通过ngx.say()返回假数据
页面再次请求,返回lua文件里的响应
没有反应的把nginx进程杀掉再试试
获取请求参数

案例
openResty配置文件
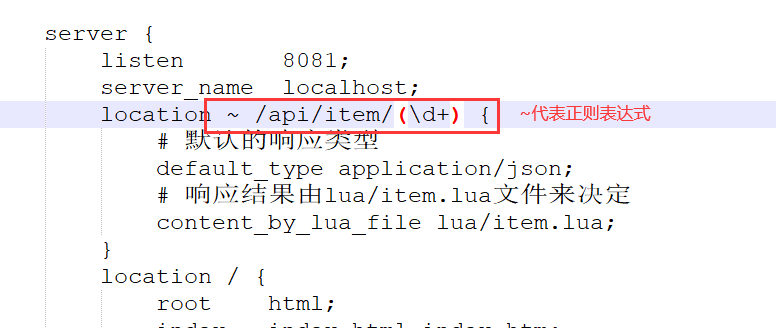
item.lua文件

OpenResty查询Tomcat
OpenResty发送http请求方式
1 | |
返回的响应内容包括:
- resp.status:响应状态码
- resp.header:响应头,是一个table
- resp.body:响应体,就是响应数据
注意:这里的path是路径,并不包含IP和端口。这个请求会被nginx内部的server监听并处理。
通过nginx反向代理发送请求到tomcat
1 | |
实例
在
/usr/local/openresty/lualib目录下编写common.lua工具类将read_http函数封装到_M这个table类型的变量中,并且返回,这类似于导出
使用的时候,可以利用
require('common')来导入该函数库,这里的common是函数库的文件名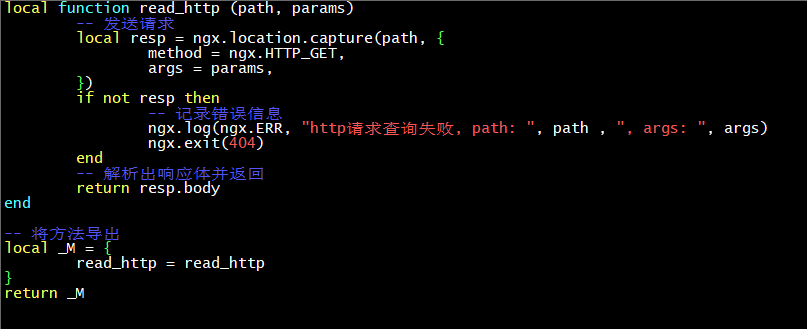
在
/usr/local/openresty/nginx/conf/nginx.conf配置文件中添加location1
2
3location /item {
proxy_pass http://192.168.229.1:8081;
}修改item.lua文件
1
2
3
4
5
6
7
8
9
10
11
12
13
14
15
16
17
18
19
20
21
22
23-- 导入自定义的common.lua 工具模块
local common = require('common')
-- 导入json解析模块
local cjson = require('cjson')
-- 获取id
local id = ngx.var[1];
-- 从common中获取read_http函数
local read_http = common.read_http
-- 发送请求获取商品和库存
local itemJson = read_http('/item/' .. id, nil)
local itemStockJson = read_http('/item/stock/' .. id, nil)
-- 解析json,将两个查询结果合成一个
local item = cjson.decode(itemJson)
local stock = cjson.decode(itemStockJson)
item.stock = stock.stock
item.sold = stock.sold
-- 将查询结果重新序列化为json并返回
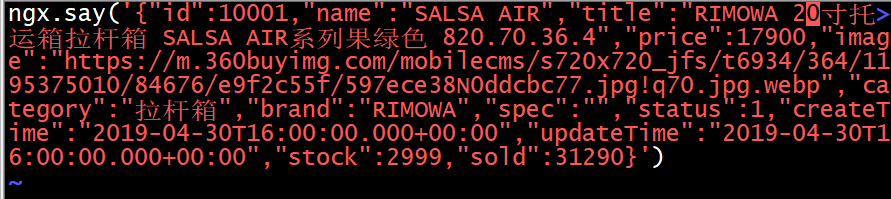
ngx.say(cjson.encode(item))nginx重新加载配置文件
1
nginx -s reload
基于查询id的负载均衡
相同的id都会代理到同一台tomcat服务器,不会出现一条数据缓存在多台服务器上的冗余
1 | |
1 | |
OpenResty查询Redis
Redis预热
Redis刚启动时没有缓存,将热点数据提前查询并保存到Redis中称为预热
docker 安装redis
1
docker run --name redis -p 6379:6379 -d redis redis-server --appendonly yes引入redis依赖
1
2
3
4<dependency>
<groupId>org.springframework.boot</groupId>
<artifactId>spring-boot-starter-data-redis</artifactId>
</dependency>配置redis地址
1
2
3spring:
redis:
host: 192.168.229.128编写初始化类
InitializingBean接口:为bean提供了属性初始化后的处理方法,它只有一个afterPropertiesSet方法,凡是继承该接口的类,在bean的属性初始化后都会执行该方法。
ObjectMapper:spring默认的json处理工具
1
2
3
4
5
6
7
8
9
10
11
12
13
14
15
16
17
18
19
20
21
22
23
24
25
26
27
28
29
30
31
32
33
34
35
36
37
38
39
40
41
42package com.heima.item.config;
@Component
public class RedisHandler implements InitializingBean {
@Autowired
private StringRedisTemplate redisTemplate;
@Autowired
private ItemService itemService;
@Autowired
private ItemStockService itemStockService;
//json解析
private static ObjectMapper mapper = new ObjectMapper();
/**
* 在对象被Spring创建并且成员变量全部注入后执行
* @throws Exception
*/
@Override
public void afterPropertiesSet() throws Exception {
//获取要放入redis中的数据
List<Item> itemList = itemService.list();
for (Item item : itemList) {
//转为json并存入redis
String json = mapper.writeValueAsString(item);
redisTemplate.opsForValue().set("item:id:" + item.getId(), json);
}
// 3.查询商品库存信息
List<ItemStock> stockList = itemStockService.list();
// 4.放入缓存
for (ItemStock stock : stockList) {
// 2.1.item序列化为JSON
String json = mapper.writeValueAsString(stock);
// 2.2.存入redis
redisTemplate.opsForValue().set("item:stock:id:" + stock.getId(), json);
}
}
}重启服务就能看到redis中被添加了数据
查询Redis缓存
在
/usr/local/openresty/lualib/common.lua中封装查询redis的函数1
2
3
4
5
6
7
8
9
10
11
12
13
14
15
16
17
18
19
20
21
22
23
24
25
26
27
28
29
30
31
32
33
34
35
36
37
38
39
40
41
42
43
44
45
46
47
48
49
50
51
52
53
54
55
56
57
58
59
60
61
62
63
64
65
66-- 导入依赖库
-- resty目录下的redis依赖库
local redis = require('resty.redis')
-- 发送http请求到tomcat
local function read_http (path, params)
-- 发送请求
local resp = ngx.location.capture(path, {
method = ngx.HTTP_GET,
args = params,
})
if not resp then
-- 记录错误信息
ngx.log(ngx.ERR, "http请求查询失败, path: ", path , ", args: ", args)
ngx.exit(404)
end
-- 解析出响应体并返回
return resp.body
end
-- 初始化redis
local red = redis:new()
red:set_timeouts(1000, 1000, 1000) -- 连接超时,请求超时,响应超时
-- 释放redis连接
local function close_redis (red)
local pool_max_idle_time = 10000 -- 连接的空闲时间,ms
local pool_size = 100
local ok, err = red:set_keepalive(pool_max_idle_time, pool_size)
if not ok then
ngx.log(ngx.ERR, "释放redis连接失败", err)
end
end
-- 查询redis
local function read_redis(ip, port, key)
-- 获取一个连接
local ok, err = red:connect(ip, port)
if not ok then
ngx.log(ngx.ERR, "连接Redis失败", err)
return nil
end
-- 查询redis
local resp, err = red:get(key)
if not resp then
ngx.log(ngx.ERR, "查询Redis失败", err, "key = ", key)
end
-- 查询的数据为空时
if resp == ngx.null then
resp = nil
ngx.log(ngx.ERR, "查询Redis数据为空", err, "key = ", key)
end
-- 释放连接
close_redis(red)
-- 这里resp是json数据,不用resp.body
return resp
end
-- 将方法导出
local _M = {
read_http = read_http,
read_redis = read_redis
}
return _M修改
/usr/local/openresty/lua/item.lua文件,改为先查redis再查tomcat1
2
3
4
5
6
7
8
9
10
11
12
13
14
15
16
17
18
19
20
21
22
23
24
25
26
27
28
29
30
31
32
33
34
35
36
37
38-- 导入自定义的common.lua 工具模块
local common = require('common')
-- 从common中获取函数
local read_http = common.read_http
local read_redis = common.read_redis
-- 导入json解析模块
local cjson = require('cjson')
-- 封装查询方法
local function read_data(key, path, params)
-- 查询redis缓存
local data = read_redis("127.0.0.1", 6379, key)
if not data then
ngx.log(ngx.ERR, "redis查询失败,尝试查询http, key:", key)
data = read_http(path, params)
end
return data
end
-- 获取id
local id = ngx.var[1];
-- 发送请求获取商品和库存
local itemJson = read_data('item:id:' .. id, '/item/' .. id, nil)
local itemStockJson = read_data('item:stock:id:' .. id, '/item/stock/' .. id, nil)
-- 解析json,将两个查询结果合成一个
local item = cjson.decode(itemJson)
local stock = cjson.decode(itemStockJson)
item.stock = stock.stock
item.sold = stock.sold
-- 将查询结果重新序列化为json并返回
ngx.say(cjson.encode(item))修改控制层逻辑,当查到JVM缓存的时候给Redis也存一份数据
1
2
3
4
5
6
7
8
9
10
11
12
13
14
15
16
17
18
19
20
21
22
23
24
25
26
27
28
29
30
31@GetMapping("/{id}")
public Item findById(@PathVariable("id") Long id){
//先查缓存,没有再查数据库
Item data = itemCache.get(id, key -> {
return itemService.query()
.ne("status", 3).eq("id", id)
.one();
});
//查到JVM缓存了,说明redis中没有数据,存入redis一份数据
try {
redisTemplate.opsForValue().set("item:id:" + id, mapper.writeValueAsString(data));
} catch (JsonProcessingException e) {
e.printStackTrace();
}
return data;
}
@GetMapping("/stock/{id}")
public ItemStock findStockById(@PathVariable("id") Long id){
ItemStock data = itemStockCache.get(id, key -> {
return stockService.getById(id);
});
//查到JVM缓存了,说明redis中没有数据,存入redis一份数据
try {
redisTemplate.opsForValue().set("item:stock:id:" + id, mapper.writeValueAsString(data));
} catch (JsonProcessingException e) {
e.printStackTrace();
}
return data;
}
OpenResty查询本地缓存
OpenResty为Nginx提供了shard dict的功能,可以在nginx的多个worker之间共享数据,实现缓存功能。
在nginx.conf的html下中开启本地缓存
1
2# 开启共享字典(本地缓存)名称叫做:item_cache,大小150m
lua_shared_dict item_cache 150m;修改
/usr/local/openresty/lua/item.lua文件,添加本地缓存逻辑1
2
3
4
5
6
7
8
9
10
11
12
13
14
15
16
17
18
19
20
21
22
23-- 导入共享词典,本地缓存
local item_cache = ngx.shared.item_cache
-- 封装查询方法
local function read_data(key, path, params)
-- 先查本地缓存
local data = item_cache:get(key)
if not data then
ngx.log(ngx.ERR, "本地缓存查询失败, 尝试查询Redis, key: ", key)
-- 查询redis缓存
data = read_redis("127.0.0.1", 6379, key)
if not data then
ngx.log(ngx.ERR, "redis查询失败,尝试查询http, key:", key)
-- 查询tomcat缓存
data = read_http(path, params)
end
end
-- 添加本地缓存, 键,值,过期时间
item_cache:set(key, data, 1000)
return data
end
缓存同步
缓存数据同步的常见方式有三种:
设置有效期:给缓存设置有效期,到期后自动删除。再次查询时更新
- 优势:简单、方便
- 缺点:时效性差,缓存过期之前可能不一致
- 场景:更新频率较低,时效性要求低的业务
同步双写:在修改数据库的同时,直接修改缓存
- 优势:时效性强,缓存与数据库强一致
- 缺点:有代码侵入,耦合度高;
- 场景:对一致性、时效性要求较高的缓存数据
异步通知:修改数据库时发送事件通知,相关服务监听到通知后修改缓存数据
- 优势:低耦合,可以同时通知多个缓存服务
- 缺点:时效性一般,可能存在中间不一致状态
- 场景:时效性要求一般,有多个服务需要同步
Canal
canal是阿里巴巴旗下的一款开源项目,基于Java开发。基于数据库增量日志解析,提供增量数据订阅&消费。GitHub的地址:https://github.com/alibaba/canal
Canal是基于mysql的主从同步来实现的
Canal就是把自己伪装成MySQL的一个slave节点,从而监听master的binary log变化。再把得到的变化信息通知给Canal的客户端,进而完成对其它数据库的同步。
Canal安装
1.先打开mysql主从
1
2
3
4
5
6# 打开mysql容器挂载的日志文件/tmp/mysql/conf
vi /tmp/mysql/conf/my.cnf
# 添加内容(二进制日志记录的位置,记录的数据库)
log-bin=/var/lib/mysql/mysql-bin
binlog-do-db=heima1.1添加用于数据同步的用户
1
2
3create user canal@'%' IDENTIFIED by 'canal';
GRANT SELECT, REPLICATION SLAVE, REPLICATION CLIENT,SUPER ON *.* TO 'canal'@'%' identified by 'canal';
FLUSH PRIVILEGES;1.2重启mysql容器
1
2
3
4docker restart mysql
#查看是否成功开启
show master status;2.创建网络让mysql和canal能够通信
1
2
3
4# 创建网络(名字加heima)
docker network create heima
# 将mysql容器添加到网络中
docker network connect heima mysql3.安装canal
4.创建Canal容器
1
2
3
4
5
6
7
8
9
10
11docker run -p 11111:11111 --name canal \
-e canal.destinations=heima \
-e canal.instance.master.address=mysql:3306 \
-e canal.instance.dbUsername=canal \
-e canal.instance.dbPassword=canal \
-e canal.instance.connectionCharset=UTF-8 \
-e canal.instance.tsdb.enable=true \
-e canal.instance.gtidon=false \
-e canal.instance.filter.regex=heima\\..* \
--network heima \
-d canal/canal-server:v1.1.5-p 11111:11111:这是canal的默认监听端口-e canal.instance.master.address=mysql:3306:数据库地址和端口,如果不知道mysql容器地址,可以通过docker inspect 容器id来查看-e canal.instance.dbUsername=canal:数据库用户名-e canal.instance.dbPassword=canal:数据库密码-e canal.instance.filter.regex=:要监听的表名称
使用Canal
当Canal监听到binlog变化时,会通知Canal的客户端
使用GitHub上的第三方开源的canal-starter客户端来使用Canal
导入依赖
1
2
3
4
5<dependency>
<groupId>top.javatool</groupId>
<artifactId>canal-spring-boot-starter</artifactId>
<version>1.2.1-RELEASE</version>
</dependency>编写配置文件
1
2
3canal:
destination: heima #canal集群名称
server: 192.168.229.128:11111 #canal对应ip端口通过@Id、@Column、等注解完成Item与数据库表字段的映射
1
2
3
4
5
6
7
8
9
10
11
12
13
14
15
16
17
18
19
20
21
22
23
24
25package com.heima.item.pojo;
@Data
@TableName("tb_item")
public class Item {
@TableId(type = IdType.AUTO)
@Id
private Long id;//商品id
private String name;//商品名称
private String title;//商品标题
private Long price;//价格(分)
private String image;//商品图片
private String category;//分类名称
private String brand;//品牌名称
private String spec;//规格
private Integer status;//商品状态 1-正常,2-下架
private Date createTime;//创建时间
private Date updateTime;//更新时间
@TableField(exist = false)
@Transient
private Integer stock;
@TableField(exist = false)
@Transient
private Integer sold;
}编写监听器
1
2
3
4
5
6
7
8
9
10
11
12
13
14
15
16
17
18
19
20
21
22
23
24
25
26
27
28
29
30
31
32
33/**
* 监听mysql变化,更新redis缓存和JVM缓存
*/
@CanalTable("tb_item")
@Component
public class ItemHandler implements EntryHandler<Item> {
@Autowired
private RedisHandler redisHandler;
@Autowired
private Cache<Long, Item> cache;
@Override
public void insert(Item item) {
cache.put(item.getId(), item);
redisHandler.saveItem(item);
}
@Override
public void update(Item before, Item after) {
cache.put(after.getId(), after);
redisHandler.saveItem(after);
}
@Override
public void delete(Item item) {
cache.invalidate(item.getId());
redisHandler.deleteItemById(item.getId());
}
}